Actions on Google — Starting a conversation via Push Notifications
— JavaScript, Conversational Interface, Technology — 5 min read

In my last post I wrote on adding a conversational interface to an app by using the Firestore document for the user as an integration point as part of a proof of concept (PoC) for an app I’ve got in the works.
The integration with the app wasn’t the end goal of the PoC however, the main objective was to see if I could build something that periodically engages the user in conversation and in doing so allows the user to add data without having to remember to fire up the app to add it.
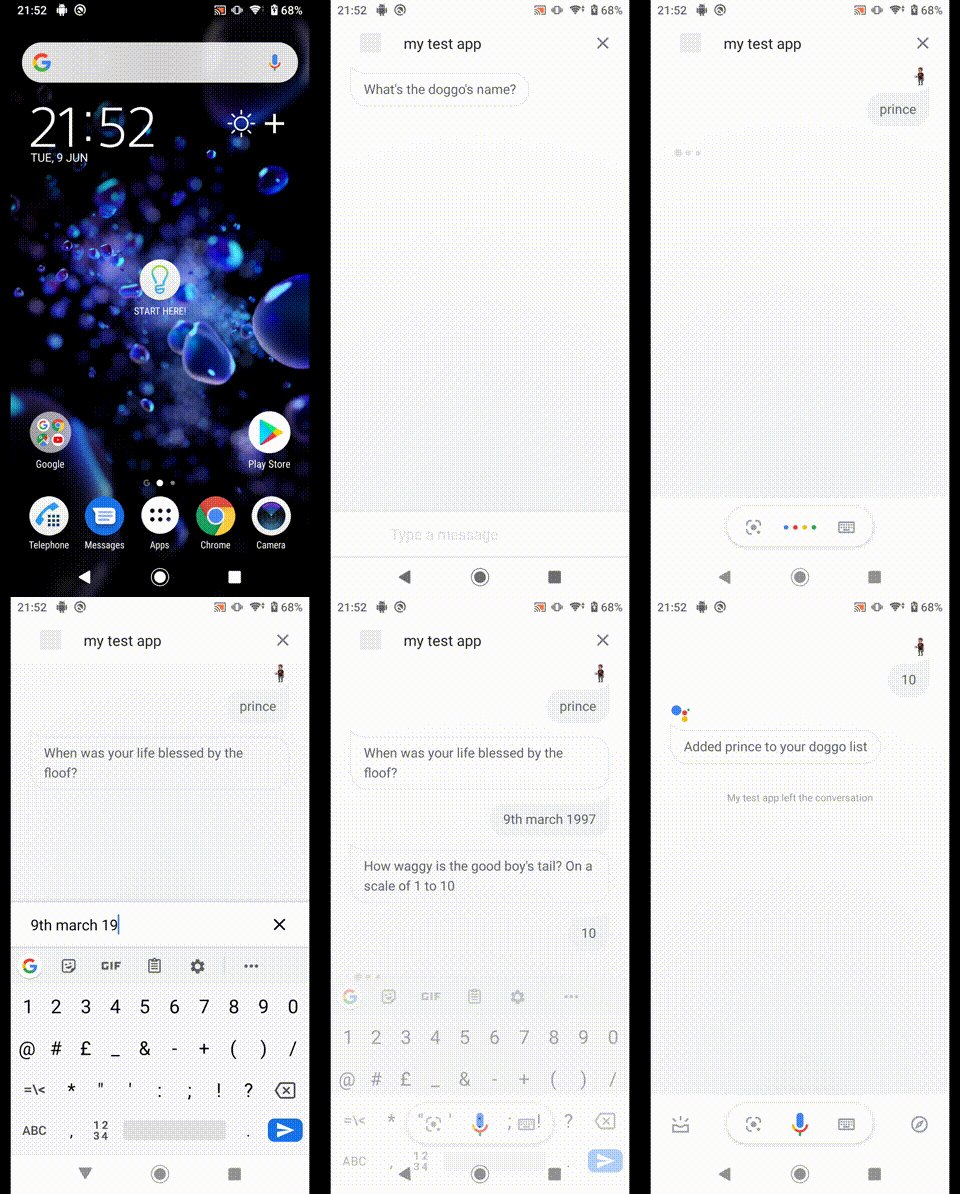
Actions on Google allows for this via the means of a push notification which when clicked will start the conversation at the desired intent so the user can answer a few questions, after which the conversation is ended and the user’s record is updated.
As with the previous post I’ve created a demo project that can be used as a basis for a web app and Action to explore how the integration works:
Pet Tracker App for my Dialogflow blog post
User Verification
In order to send the user push notifications we first need to make sure they are signed up to use our app which is a requirement for using the app linking functionality of Actions on Google.
App linking allows the Action to receive information about the user from Google and also gives access to storage on the user object that can be used by the Action to keep track of state, which in our case will be if we’ve asked the user if they want to receive notifications already.
This user state can only be accessed by users who are logged in to the device they are using to interact with the Action, a check for this can be carried again conv.user.verification which will return VERIFIED if the user is able to move forward.
If the user is not verified then we need to close the conversation with them as subsequent code will fail to run if they do not have that verified status, we can prompt this via the SignIn method from the actions-on-google library.
In order to redirect the user to sign in we first need to create a new Intent which listens for the actions_intent_SIGN_IN event and is fulfilled by our Firebase fulfilment function.
1const NOT_LOGGED_IN = 'userNotLoggedIn';2
3// Do a check to see if the user is signed in4app.middleware(async (conv) => {5 const { email } = conv.user;6 if(!email) {7 conv.data.error = NOT_LOGGED_IN;8 }9});10
11app.intent('Default Welcome Intent', async (conv) => {12 // Check to see if the user isn't verified or not logged in13 if (conv.user.verification !== 'VERIFIED' || conv.data.error === NOT_LOGGED_IN) {14 return conv.close(new SignIn());15 }16 const {payload} = conv.user.profile;17 conv.ask(`Hi ${payload.given_name}!`);18});19
20// Name of intent in Dialogflow that listens for actions_intent_SIGN_IN event21app.intent('Get SignIn', async (conv, params, signin) => {22 if (signin.status === 'OK') {23 conv.ask('What can I help you with?');24 } else {25 conv.ask('Sorry, but I won\'t be able to save your data, how can I help you?');26 }27})Prompt the user to allow notifications
Once we know that the user is logged in we can prompt them to enable push notifications. This is as simple as returning a response and two suggestions; one for if they want to allow notifications and one for if they don’t.
Regardless of the way the user answers we will set a PUSH_NOTIFICATION_ASKED flag in the user.storage so that when the user interacts with the Action again we don’t re-prompt them.
Once you’ve got permissions to send the user push notifications and you go through the flow a second time the push token will be undefined so it’s important that you don’t re-attempt this call otherwise you may encounter an error.
Intents
The suggestion response will be backed by an intent, with the intent asking the user for permissions to send push notifications and then redirecting them to another intent that will collect the user’s push token and store it.
First, we need to create the Intent for starting the permission flow, this needs a new Intent in Dialogflow with the following setup:
- Name —
setup_push - Events —
SETUP_PUSH - Training phrases —
Send me doggo reminders - Action —
setup.push - Fulfilment — Enable webhook call for this intent enabled
This will listen to the Send me doggo reminders suggestion and run the fulfilment function which in turn will trigger the permissions flow.
Second, we need to create the Intent for receiving the permissions once the user has permitted the action to send push notifications, this Intent needs this setup:
- Name —
finish_push_setup - Events —
actions_intent_PERMISSION - Training phrases —
finish_push_setup - Action —
finish.push.setup - Fulfilment — Enable webhook call for this intent enabled
Fulfilment
In the fulfilment code we’ll add the following functions to the intents:
setup_push \
Will create the call to UpdatePermissions which will take the Add Doggo intent as a command, this will be the intent that gets fired off when the user receives the notification
finish_push_setup
With the user agreeing to push notifications our finish_push_setup intent will get fired with the following arguments, which we’ll use to get the push token:
- PERMISSION — Did the user permit push?
- UPDATES_USER_ID — The user’s push token
We want to store that UPDATES_USER_ID in our database as we will need to supply it as part of the push notification payload.
1const PUSH_NOTIFICATIONS_ASKED = 'askedAboutPush';2app.intent('Default Welcome Intent', async (conv) => {3 if (!conv.user.storage[PUSH_NOTIFICATION_ASKED]) {4 conv.ask('Would you be interested in regular conversations to keep your doggo information up to date?');5 conv.ask(new Suggestions(['Send me doggo reminders', 'No reminders for me please']));6 conv.user.storage[PUSH_NOTIFICATION_ASKED] = true;7 } else {8 conv.ask(`How can I help you today?`);9 }10});11
12app.intent('setup_push', async (conv) => {13 conv.ask(new UpdatePermission({14 intent: 'Add Doggo',15 }));16});17
18app.intent('finish_push_setup', async (conv, params) => {19 if (conv.arguments.get('PERMISSION')) {20 const updatesUserId = conv.arguments.get('UPDATES_USER_ID');21 // Store UPDATES_USER_ID in database for later use22 conv.close(`Ok, I'll start alerting you.`);23 } else {24 conv.close(`Ok, I won't alert you.`);25 }26});Actions on Google Integration setup
The last thing to do is to set the Intents up in Actions on Google, this will tell Actions on Google that these Intents exist and that our Add Doggo Intent wants to send notifications.
In Dialogflow, open the Actions on Google Integration Settings (under Integrations, click the Integration Settings button in the Actions on Google box) and add the Add Doggo Intent to the Implicit Invocation list.
In the same dialog press the Manage Assistant App button to open up the Actions Console, here under the Develop -> Actions menu item we need to edit the Add Doggo entry to allow push notifications.
The settings for this are under the User Engagement section and we need to enable the Would you like to send push notifications? option and supply a name for this engagement.
Once this is saved our fulfilment functions will have the correct permissions to set up the push notification permission.
Sending a push notification
Now we’ve got the user’s push token we can start sending them notifications, this is done via an authenticated API call with a payload containing the user’s push token and the intent we want the notification to trigger and the title for the notification.
In order to use this API though we first need to enable it, this can be done at https://console.developers.google.com/apis/api/actions.googleapis.com , you just need to press the Use API button to set it up.
Authenticating with Google
In order to send a push notification we need to get a JWT from Google that we can use to authenticate with their server, this JWT needs to be generated with a service account that has the ‘Project Owner’ role, more details can be found on Google’s Push Notification documentation.
You can use the googleapis library in Node to get a JWT to use to authenticate with Google’s services using the following command in the folder where you push Service Account lives:
1const { google } = require('googleapis');2const serviceAccount = require('./pushServiceAccount');3const jwtClient = new google.auth.JWT(serviceAccount.client_email, null, serviceAccount.private_key, ['https://www.googleapis.com/auth/actions.fulfillment.conversation'], null);4jwtClient.authorize((err, tokens) => console.log(tokens.access_token))Once we have the JWT we then use it to send the payload to https://actions.googleapis.com/v2/conversations:send which will then send the push notification to the user, this takes the shape of:
1{2 "customPushMessage": {3 "userNotification": {4 "title": "Have you got any new doggos?"5 },6 "target": {7 "userId": "TOKEN",8 "intent": "Add Doggo"9 }10 },11 "isInSandbox": true12}On receiving the notification the user’s device will start that intent when the user responds to it, this means that if we created an intent that asked the user a set of questions to update their records we’d be able to prompt them periodically and engage them in a conversation that results in their records being up-to-date with minimal effort on their part.
Summary

Being able to start a conversation with the user makes your Action more valuable if there’s a need to add data over time as you bring the conversation to them instead of hoping they remember to add that data.
This type of conversation however does need to be designed to make data entry as quick as possible, using suggestions and cards to allow the user to jump straight to the point so that they don’t drop off halfway due the notification arriving at a bad time and the interaction taking too long to complete.
Get the code
I’ve pulled together a demo project that contains the Action and test code for push notifications, this is also available on the actions-on-google-push-notifications branch of the demo project I created as part of my blog — Adding a conversational interface to your app with Dialogflow.