Adding a conversational interface to your app with Dialogflow
— JavaScript, Conversational Interface, Technology — 8 min read

I’ve recently been building a proof of concept (PoC) for an app I’m hoping to turn into a business and one of the areas I wanted to explore was to have a conversational interface that allows users to quickly add data without the need to fire up their web browser.
I’ve had a limited experience with chatbots and conversational interfaces, having built a discord bot a year or so ago but my target audience wouldn’t be using Discord, so I decided to look at Dialogflow as I had an introduction to it at a meet-up I had previously attended.
Dialogflow is Google’s conversational interface designer and works with a number of services but as it’s a Google product, it works very well with Google Assistant which was the platform I targeted for my PoC.
Luckily you’re not completely locked into Google’s environment however as the fulfilment of the chat interface’s commands (called Intents) can utilise any backend that will respond to its HTTP requests, I am however using Firebase for this tutorial.
The web app, Firebase Functions and a backup of the Dialogflow agent can be found in the demo project I’ve created on Gitlab.
Pet Tracker App for my Dialogflow blog post*gitlab.com
The app we’re enhancing

In previous blog posts I’ve covered working with Firebase’s Cloud Firestore database and we’ll be using this as an integration point between the web app and the conversational interface.
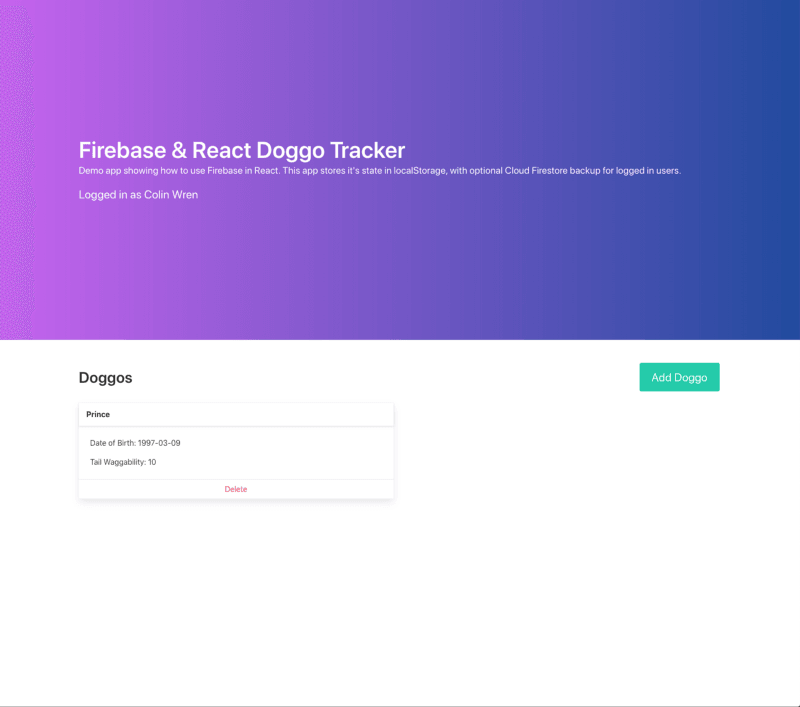
In the demo project there’s an example web app that can be hosted on Firebase which is a simple ‘doggo tracker’ where a user, after logging in can view, edit, remove and add dog they have.

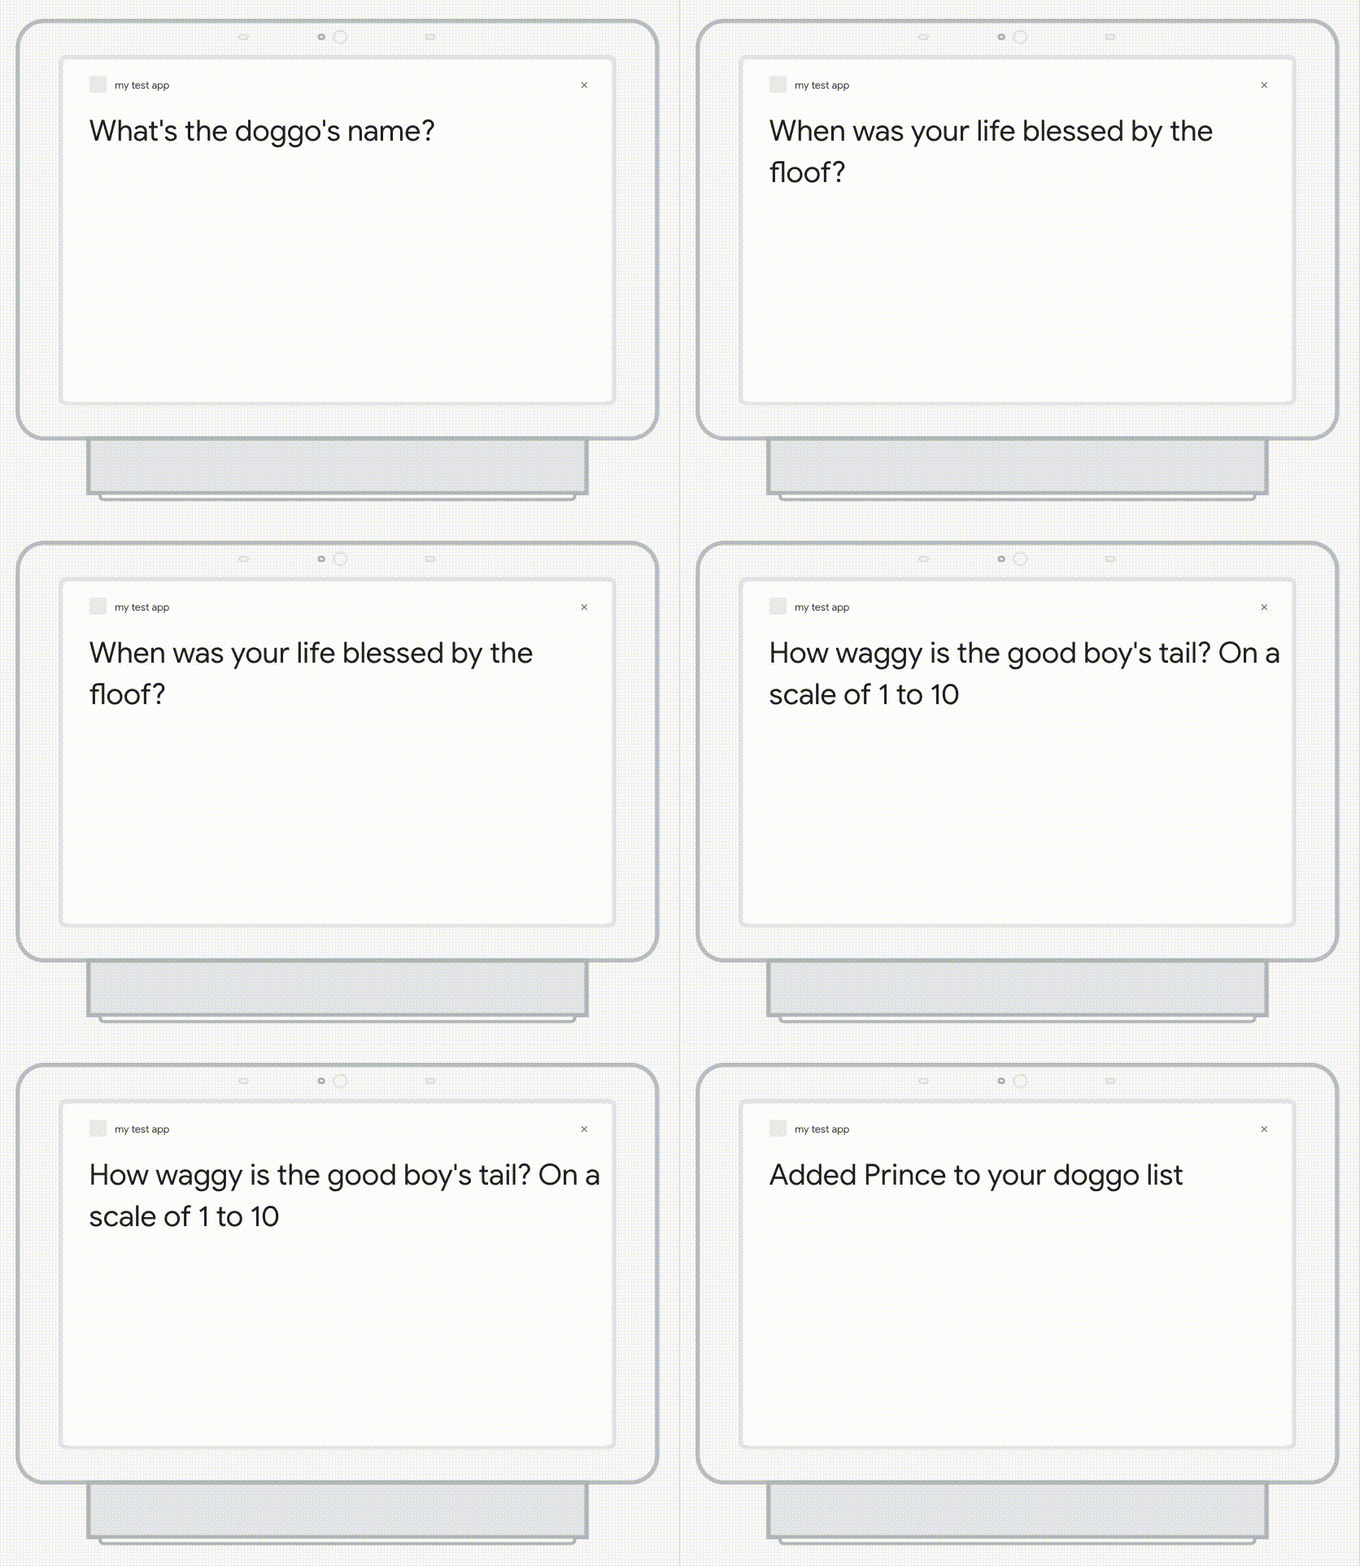
The conversational interface will then allow the user to add a new pet by saying “Hey Google, I’ve bought a new doggo” which will then ask the user a set of questions to get the data needed to add a new doggo to the system, at which point it will create a new record for that user.
Project setup
In order to follow along with this project you’ll need the following:
A Google account
As we’re using Firebase, which is owned by Google you’ll need to sign up for a Google account if you don’t already have one.
A Firebase project
You can create this via the firebase console, it’s important to make sure that Firebase project is linked to a Google Cloud Platform project as this will be needed in the Dialogflow setup.
Working web app integrated with the Cloud Firestore database
The web app in the demo project can be used for this, just save the Firebase credentials object into src/crendentials.js , setting it as the default export and make sure the Firestore rules are set to:
1rules_version = '2';2service cloud.firestore {3 match /databases/{database}/documents {4 match /doggos/{userId} {5 allow read, update, delete: if request.auth.uid == userId;6 allow create: if request.auth.uid != null;7 }8 }9}These security rules make it so users can only read, update or delete their own records and create records if they’re authenticated. We’re also going to be using the user’s Firebase ID as the document key.
Creating the conversation in Dialogflow
Now we’ve got a web app that’s using Firebase to store and retrieve data we can now build the conversational interface that’s going to use that information.
Create a new agent in Dialogflow
Once you’ve signed into the Dialogflow console you can create a new agent from the left hand menu.
When creating the agent make sure that in the Google Project section you select the same project as the one used by your Firebase project.
Add the ‘Add Doggo’ intent
Intents are queries made by the user to Dialogflow which will map a collection of input phrases to the either static responses or to a backend to fulfil the request.
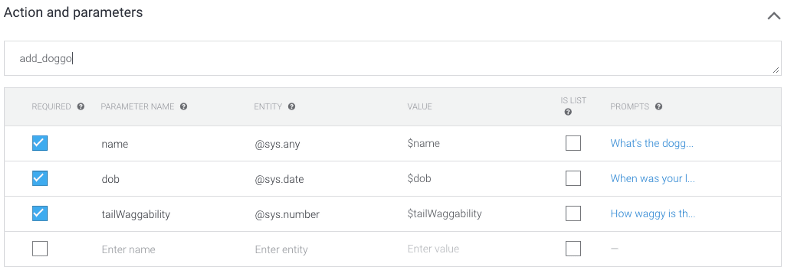
If there’s a particular set of data you want to collect from the user before responding you can use the parameters section to define the information you want to collect, the type of that data and provide a set of prompts for the user to reply to.
Our basic intent will respond to ‘I want to add a doggo’ and prompt the user to answer questions to get information about the dog, we can also trigger the intent via an event so set this to ADD_DOGGO (you need to press enter for it to create the event).
Add parameters
In order to add a dog to the system we want to collect the following data:
- The name of the dog
- The dog’s date of birth
- How much it wags it’s tail (on a scale of 1 to 10)
Under the Actions and Parameters section we can add these parameters. Setting a parameter as required will give the user a prompt to provide the information.

Training phrases
In order for Dialogflow to better match the query to the intent, we need to provide it with a set of training phrases. If there is too small a data set to work with it may fail to detect the intent.
As we’re only dealing with a basic example we can just use variations on ‘I want to add a doggo’ for now, but if it was more advanced with entity detection we’d need to provide examples for that.
Test it
Included in the demo project is a set of ‘unit’ tests for the intent using Jest.
You can easily test Dialogflow intents using nothing more than a POST request to an endpoint but it’s easier if we add some structure to the tests in order to report on them and to run them automatically.
In order to create a test we want to perform the following actions:
- Arrange — Set up a new Dialogflow session (taken care of by
DialogflowApiFactory.jsin demo project) - Act — Send the query to Dialogflow (using
dialogflow.detectIntent()in demo project) - Assert — Verify the JSON we receive is correct (using Jest’s
expect.objectContaining()matcher)
In order to create the Dialogflow session you’ll need to create a service account in Google Cloud Platform for your project (GCP project link available from Dialogflow agent settings), there should already be a service account set up with Dialogflow permissions so you just need to create a new key for this.
If you need to create a new service account, make sure it has the Dialogflow API Client permissions.
If you use the DialogflowApiFactory from the demo project you’ll need to supply it the following information:
projectId— This is theproject_idin the service accountserviceAccount— This is the JSON object from GCPsessionID— This can be any value but a UUID ensure no clashes
1const addDoggoTrigger = 'I want to add a doggo';2
3describe('Add Doggo Intent', () => {4 let dialogflow = undefined;5 let sessionId = v4();6
7 beforeAll(async () => {8 dialogflow = await DialogflowApiFactory.create({9 projectId: serviceAccount.project_id,10 serviceAccount,11 sessionId,12 })13 });14
15 afterEach(async () => {16 await dialogflow.clearSession(sessionId);17 });18 19 it('Creates the doggo object and ends the conversation after getting data', async () => {20 const response = await dialogflow.detectIntent(addDoggoTrigger);21 expect(response).toEqual(expect.objectContaining(initialResponse));22 const nameResp = await dialogflow.detectIntent(doggoName);23 expect(nameResp).toEqual(expect.objectContaining(nameResponse));24 const dobResp = await dialogflow.detectIntent(doggoDob);25 expect(dobResp).toEqual(expect.objectContaining(dobResponse));26 const wagResp = await dialogflow.detectIntent(`${doggoTailWaggability}`);27 expect(wagResp).toEqual(expect.objectContaining(wagResponse));28 });29})Adding fulfilment
The conversation will collect the information needed to create a dog object but it won’t be able to store that data in the Firestore document store for the app to then retrieve.
In order to do this we need to set up the fulfilment in Dialogflow. This is pretty straightforward to do as we just need to enable the Webhook option in the Fulfilment menu item and add a URL for Dialogflow to POST data.
As we’re already using Firebase I’m going to use Firebase functions to handle the fulfilment but any publicly accessible URL would work.
We’ll then also enable fulfilment in the ‘Add Doggo’ intent so Dialogflow knows to send the data to the fulfilment function to get a response to send to the user.
Creating a Firebase function to fulfil the user’s request
The Firebase CLI offers a really simple means of getting started with functions via firebase init and checking the Functions option. This will then create a subfolder with the structure needed to create and deploy a Firebase function.
In order to get the user’s Firebase ID we’re going to need to use the actions-on-google library as Dialogflow itself doesn’t have access to this information.
We’ll then create a simple function that’s going to listen for the ‘Add Doggo’ intent to be fulfilled, read the list of doggos the user has and append the new doggo to it. If they don’t have an existing document then we’ll create it with the doggo they’ve provided.
Once we’ve successfully updated the database we’ll then close the conversation.
1app.intent('Add Doggo', async (conv, { name, dob, tailWaggability }) => {2 conv.data.name = name;3 conv.data.dob = dob;4 conv.data.tailWaggability = tailWaggability;5 const doggoObj = {6 name,7 dob,8 tailWaggability,9 };10 const doggosRef = await conv.doggos.ref.get();11 if (doggosRef.exists) {12 const data = await doggosRef.data();13 let { doggos } = data;14 if (Array.isArray(doggos)) {15 doggos.push(doggoObj);16 } else {17 doggos = [doggoObj];18 }19 await doggosRef.ref.set({ ...data, ...{ doggos }});20 } else {21 await doggosRef.ref.set({ doggos: [doggoObj] });22 }23 return conv.close(`Added ${name} to your doggo list`);24});Testing the fulfilment function
In order to test your fulfilment function you first need to know the payload that will be sent from Dialogflow to the fulfilment webhook.
You can get this by supplying a dummy URL in the fulfilment option and using the agent debugger on the right which will show DIAGNOSTICS INFO . The payload is found under the FULFILMENT REQUEST tab, save this to a .json file so we can import into our test.
Once we have the request payload we’ll be testing the fulfilment function by passing that request in and verifying it returns the correct response.
1describe('Add Doggo Fulfilment', () => {2 afterEach(() => {3 mockDocSet.mockReset();4 });5 6 test('Creates the doggo array if the user has no doggos', async () => {7 const response = await testFulfilment(addDoggoRequest(), {});8 expect(mockDocSet).toHaveBeenCalledWith(expectedUpdate);9 expect(response.body).toEqual(expect.objectContaining(addDoggoResponse));10 });11});Test setupIn order to unit test the firebase function we need to remove the external dependencies.
Removing the dependency on being exposed via Firebase is pretty easy as we can export the fulfilment function from the index.js file without the functions.https.onRequest wrapper, that way we can invoke the app itself in tests.
Removing the authentication and database dependencies requires a bit of mocking but as I previously covered in my Firebase article, Jest makes mocking the modules really painless.
The following google modules needed to be mocked in order for the demo project’s fulfilment tests to run, as well as the firebase mock for the calls to auth :
1/**2 * File: __mocks__/google-auth-library.js3 */4class OAuth2Client {5 constructor() {}6 verifyIdToken(token) {7 return {8 getPayload: jest.fn().mockImplementation(() => ({9 email: `${token.idToken}@test.com`,10 })),11 };12 }13}14
15module.exports = {16 OAuth2Client,17}18
19/**20 * File: __mocks__/googleapis.js21 */22module.exports = {23 GoogleApis: jest.fn(),24}25
26
27/**28 * File: __mocks__/googleapis-common.js29 */30module.exports = {}A gotcha\
When running the test with Jest you’ll need to make sure that you set the testEnvironment to node otherwise you’ll encounter a really annoying error showing:
1[ERR_INVALID_ARG_TYPE]: The "path" argument must be of type string. Received an instance of ObjectDeploying the fulfilment function
This is probably the easiest part of the process, using the Firebase CLI we just need to run firebase deploy --only functions which will then compile and upload the function to the Firebase functions service.
After the function is uploaded the CLI will print a URL that the function is available at, we just need to update the fulfilment URL in Dialogflow to point at this URL and make sure our ‘Add Doggos’ intent has Enable webhook call for this intent set to enabled.
Device tests
So far we’ve tested the Dialogflow and the fulfilment components in isolation but ideally we’d be able to conduct an end-to-end test through the entire journey.
Simulator
If you enable the Actions on Google integration (found under the Integrations menu item) you can access the Google Assistant simulator.
The simulator offers a bunch of environment and user based configuration options such as:
- Type of device being used
- Language being used
- User location
- User account verification
- Sandbox settings (to prevent real transactions taking place)
Ever interaction with the simulator gets recorded on the right hand side so you can see the request and response payloads, as well as the audio being sent if testing voice commands.
On-device testing
If you’re logged into Dialogflow with the Google account you use on your phone you can also test using that device, you just need to say ‘Talk to [APP NAME]’ to start the conversation.
I believe if you add others to your project they can also access the conversational interface on their Google Assistant app.
Viewing the data submitted in the app
As the Firestore document for the user is acting as our integration point the data the user submits via conversations with the agent is available to them immediately, provided there’s a mechanism to grab the new data.
For the demo app, I’ve got a document fetch running when the user’s authentication state changes so a simple refresh would take care of this.
Summary
Dialogflow is an amazing tool and while this tutorial has been focused on the services that Google offers it has a number of integrations with platforms such as Slack, Telegram, Facebook Messenger and also offers drop in chat agents for websites as well as voice chat.
Actions on Google is another great tool that I’ll cover in another post soon as it offers a means to start a conversation with the user which is a piece of functionality that I’m currently exploring further in the proof of concept for my app I’m building.
I particularly like the test-ability of Dialogflow and the actions-on-google library, when I was first introduced to the tools at the meetup they looked like they’d be a pain to build tests around but the fact it’s all JSON makes it so much easier to work with.
I do want to try out Botium soon too, Botium is an abstraction layer over the interaction with the agent aimed at making writing tests for conversational interfaces easier and uses its own conversational specification style.
Conversational interfacing testing is an interesting space as tools like Botium, much like Selenium and Cucumber have great potential but that’s only realised when the appropriate design patterns are put in place to ensure the tests don’t become fragile and hard to work with.