Adding a mini-map to your Konva canvas using react-konva
— JavaScript, Software Development — 3 min read
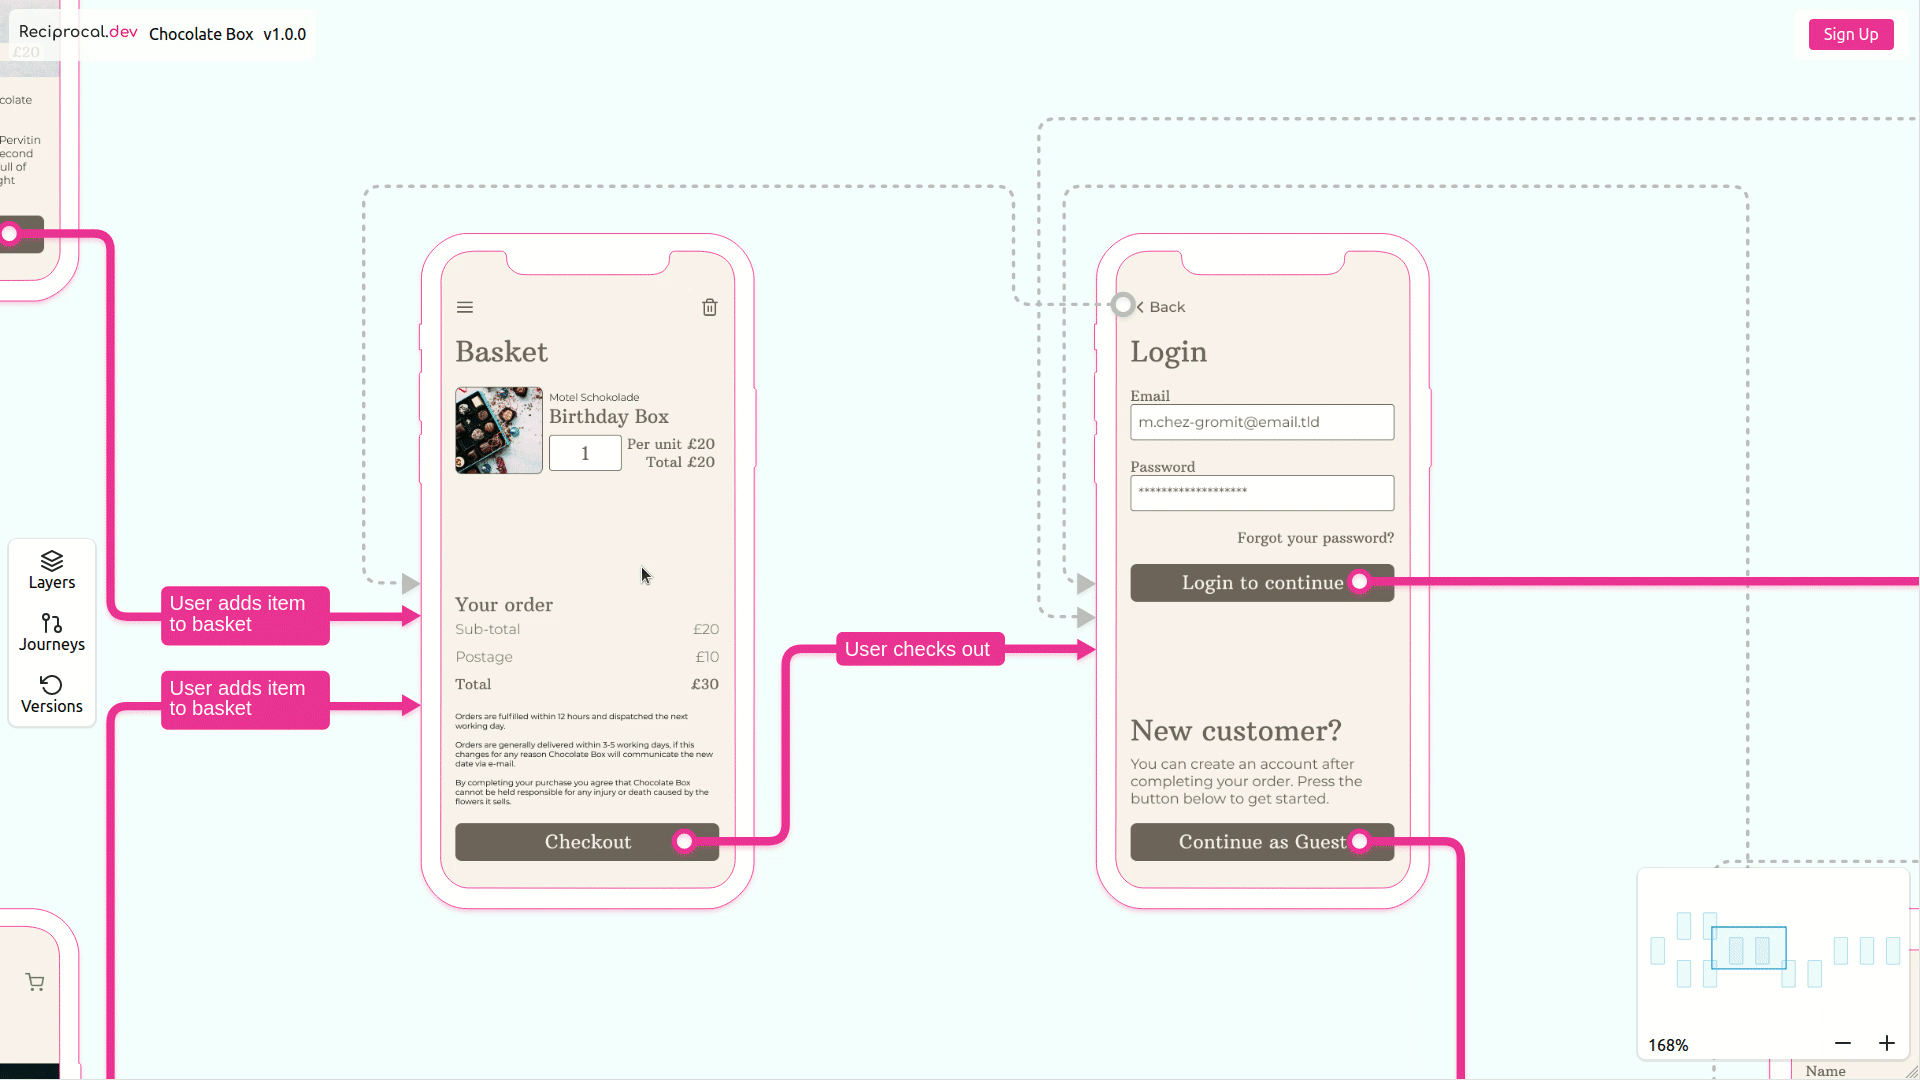
As part of building reciprocal.dev I’ve been working with Konva (and react-konva) to create an MVP of the user journey mapping tools in order to validate the idea.
Over time, the example map that I built for our MVP has become larger than the browser window and I’ve needed to introduce panning and zooming to allow the user to navigate this larger map.
With the introduction of moving the map it became crucial to give the user a means to locate themselves within the full map. To solve this problem I decided to include a mini-map.
The mini-map shows the entire map with an overlay of the user’s current view (what I’ll call the viewbox) so the user can see the position and zoom level of what they can currently see against the overall content on the canvas.
Interactivity can be added to the mini-map, allowing the user to update the position and zoom level of the current view without the need to scroll or pan.
Building the mini-map
The Reciprocal.dev UI layout is similar to Miro as it maximises the canvas space and has floating menu elements along the sides of the screen.
This UI layout means I need to render a second Konva stage in one of the floating menu elements which would show the full journey map and also show information such as zoom level and buttons to zoom in and out.
Laying out the entire map
I’m using a grid of predefined coordinates to position the screens on the full size map so I re-used that grid when laying out the mini-map as this meant I could ensure consistency between the two stages.
As the mini-map would only be for reference I didn’t want to render all the screens and connections that the full map displayed so I opted to just render a Rect in the same dimensions as one of the screens in the main map which made it clear what it represented.
As I needed to render the full map for the mini-map I needed to know how big the entire map was in order to scale it down to fit the container. I did this by calling getClientRect on the stage at a scale of 1 , this allowed me to use the returned width value to calculate the scale I needed to render the mini-map at, based on the width of the container I was rendering it on in the UI.
Showing the user’s current view
With the screens added to the mini-map I then needed to represent the sub-section of the full map that the user could see in their browser.
I did this by capturing the innerWidth and innerHeight values of the user’s browser and the x and y values returned from calling getClientRect on the stage whenever a zoom or pan ended (for improved performance over rendering every time the full map moved).
I then used a React context to share the values between the full map and the mini-map, allowing me to update the mini-maps representation of the user’s view when these values were updated.
1import { useRef, useContext } from 'react';2import { Stage, Layer, Rect, Group } from 'react-konva';3import ViewBoxContext from './ViewBoxContext'; // context to hold values between maps4
5const WIDTH = 271;6const HEIGHT = 163;7const MAP_WIDTH = 3850;8
9export function MiniMap() {10 const miniMapRef = useRef(null);11 const viewBoxRef = useRef(null);12 const {13 xPos,14 yPos, 15 scale,16 } = useContext(ViewBoxContext);17 const viewXPos = xPos / scale;18 const viewYPos = yPos / scale;19 const viewScale = (WIDTH / MAP_WIDTH) - 0.005; // To give us some padding20 const viewDimensions = {21 width: window.innerWidth / scale,22 height: window.innerHeight / scale23 };24 const devices = [] // Screen layout logic would go here25 return (26 <Stage27 width={WIDTH}28 height={HEIGHT}29 ref={miniMapRef}30 scaleX={viewScale}31 scaleY={viewScale}32 >33 <Layer id='screens'>34 <Group>35 {devices}36 </Group>37 </Layer>38 <Layer id='viewbox'>39 <Rect40 x={viewXPos}41 y={viewYPos}42 width={viewDimensions.width}43 height={viewDimensions.height}44 fill='rgba(86, 204, 242, 0.1)'45 stroke='#2d9cdb'46 strokeWidth={20}47 ref={viewBoxRef}48 />49 </Layer>50 </Stage>51 )52}Adding interactivity
Once I had the mini-map showing the user’s current view against the full map I wanted to add a means for them across the map by dragging the viewbox, essentially doing a pan but via the mini-map instead.
I also wanted to have a means for the user to zoom in and out on the full map from within the mini-map UI via pressing buttons to zoom.
Updating the view position
In order to make the viewbox draggable I needed to implement a few props which allow the position of the viewbox Rect to be captured and sent via a React context back to the full map to update it’s position.
This worked really well but one issue I encountered was the fact that the axis were backwards, so panning up on the mini-map would pan the full map down. To fix this I multiplied the position values by -1 in order to reverse their position.
1import { useRef, useContext, useEffect } from 'react';2import { Stage, Rect } from 'react-konva';3import ViewBoxContext from './ViewBoxContext';4
5function MiniMap() {6 const viewBoxRef = useRef(null);7 const { setMiniMapX, setMiniMapY } = useContext(ViewBoxContext);8 9 function handleDragMove() {10 if (viewBoxRef.current !== null) {11 const { x, y } = ViewBoxRef.current.getPosition();12 setMiniMapX(x * -1);13 setMiniMapY(y * -1);14 }15 }16 17 return (18 <Stage>19 <Rect20 ref={viewBoxRef}21 draggable22 onDragMove={handleDragMove}23 />24 </Stage>25 )26}27
28function FullMap() {29 const stageRef = useRef(null);30 const { miniMapX, miniMapY } = useContext(ViewBoxContext);31 32 useEffect(() => {33 if (stageREf.current !== null) {34 const stage = stageRef.current;35 const scale = stage.scaleX();36 const newXPos = miniMapX * scale;37 const newYPos = miniMapY * scale;38 stage.position({ x: newXPos, y: newYPos});39 stage.batchDraw();40 }41 }, [miniMapX, miniMapY]);42 43 return (44 <Stage ref={stageRef}>45 {/* Stuff to render */}46 </Stage>47 )48}Updating the zoom level
Hooking up the zoom buttons was relatively trivial, when the button is clicked I just multiply the current scale by 1.25 to zoom in and 0.25 to zoom out and then updated the scale value on the shared React context to update the full map.
Handling zooming by just increasing the scale wasn’t a perfect approach however, as the zoom would have on the viewbox’s current position meaning the zoom was always against the top-left of the user’s screen which was a bit jolting.
In order to make the zoom experience better I had to find the center of the stage against the current position at the current scale and then recalculate it at the new scale.
1import { useRef, useContext, useEffect } from 'react';2import { Stage, Rect } from 'react-konva';3import ViewBoxContext from './ViewBoxContext';4import MiniMap from './MiniMap';5
6function MiniMapContainer() {7 const { scale, setScaleDelta } = useContext(ViewBoxContext);8 const zoomLevel = parseInt(100 * scale, 10);9 10 function handleZoomIn() {11 setScaleDelta(0.25);12 }13 14 function handleZoomOut() {15 setScaleDelta(-0.25); 16 }17 18 return (19 <div id="mini-map">20 <div className='map'>21 <MiniMap />22 </div>23 <ul className='controls'>24 <li className='zoom-level'>{`${zoomLevel}%`}</li>25 <li className='zoom-out' onClick={handleZoomOut}>-</li>26 <li className='zoom-in' onClick={handleZoomIn}>+</li>27 </ul>28 </div>29 )30}31
32function FullMap() {33 const stageRef = useRef(null);34 const { scaleDelta, setScaleDelta, setScale } = useContext(ViewBoxContext);35 36 useEffect(() => {37 if (scaleDelta !== 0 && stageRef.current !== null) {38 const stage = stageRef.current;39 const oldScale = stage.scaleX();40 var center = {41 x: stage.width() / 2,42 y: stage.height() / 2,43 };44 var relatedTo = {45 x: (center.x - stage.x()) / oldScale,46 y: (center.y - stage.y()) / oldScale,47 };48 const newScale = oldScale + scaleDelta;49 stage.scale({ x: newScale, y: newScale });50 const newPos = {51 x: center.x - relatedTo.x * newScale,52 y: center.y - relatedTo.y * newScale,53 }54 stage.position(newPos)55 stage.batchDraw();56 setScale(newScale); // needed to ensure mini-map is updated57 setScaleDelta(0); // reset the scale delta so can handle another click58 }59 }, [scaleDelta])60 61 return (62 <Stage ref={stageRef}>63 {/* Stuff to render */}64 </Stage>65 )66}Summary
By adding a mini-map to my Konva canvas I’ve given users of Reciprocal.dev a way to navigate complex user journey maps with ease and understand what they’re currently looking against the context of the bigger picture.
There’s a little bit of logic needed to calculate the difference in scales between the two maps but aside from figuring out how to center the view when pressing the zoom buttons there was nothing too hard to get my head around.