Building a GraphQL API using Firebase Functions and Apollo
— JavaScript, Software Development — 8 min read

After the launch of the Reciprocal.dev alpha in October 2021, I started looking into how the offering we had pulled together aligned with the problem we had set out to solve.
While I was happy with the finished product, there was one nagging feeling in my head — we’d built a web app that allowed users to build interactive user journey maps but when we first defined our need for such a product we were building our user journey maps in Miro.
Following that realisation, I did a proof-of-concept of how easy it would be to bring the offerings from our web app and translate those into a Miro plugin, and while the outcome of that is something we’re still evaluating it highlighted a potential business opportunity that would have been blocked by our technical implementation.
The data model for the alpha was very focused on the data needed for the web app and we’d extensively used the Firebase SDK which meant that supporting multiple front-ends for that data was not viable given the difference in how each system’s SDK defines entities on a canvas and limitations on the libraries that can be used.
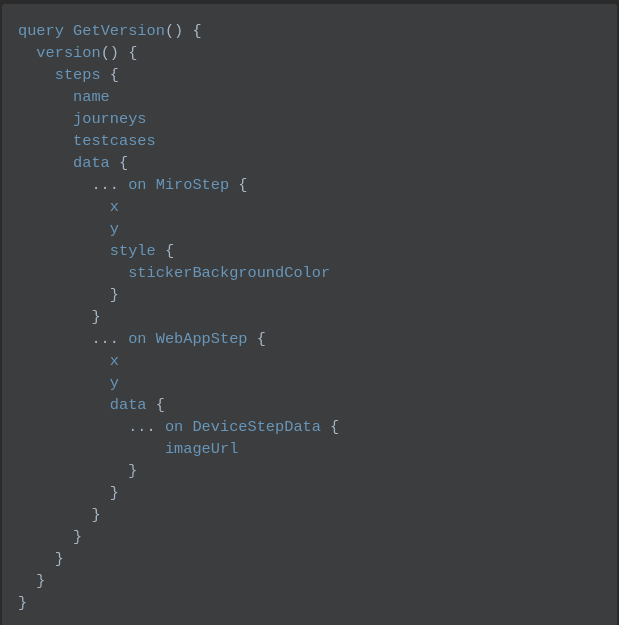
I had been using GraphQL in my day job and felt that the type conditional functionality was a good fit for our problem as it would allow the Miro plugin to request the Miro representation of an object and the web app could request the web app representation, all while keeping the structure of the rest of the data the same.

Using GraphQL (or any API) would also allow the front-end to be built against an interface which means that we can refactor the back-end without impacting the front-end, provided that the interface isn’t broken.
On the front-end, the decision to use an API should also remove the reliance on the Firebase SDK for back-end calls as I had been using functions.httpsCallable to save time as this makes it easier to work with authentication in the back-end implementation.
Without the front-end needing to use the Firebase SDK to authenticate, load/save data, and work with storage this means that the front-end would now be more portable should we wish to move to another tech stack.
Once we’d agreed to invest the time into building the GraphQL API I started by building an Apollo server that would run on a Firebase Function in order to prove the approach.
Step 1: Building the Schema
Unlike a REST API which is reliant on supporting information (Swagger, JSON schema, etc.) to define the type of object returned from the API, GraphQL bakes these types into the very definition of the API by means of a schema that not only defines the type of the objects returned but also the operations and the arguments for those operations.
If you’ve used JSON schema before then you should find it relatively easy to work with GraphQL schemas, although there are a few differences such as GraphQL’s lack of in-built support of Map / Object / Dict objects and the need to have separate Input types for arguments, even if they’re the same as another type in the schema.
The schema is used by the GraphQL server at run time to determine which queries and mutations will be exposed by the server and will be used to validate calls to those operations so it made sense for me to start building the schema first.
I like to use Architectural Decision Records (ADRs) in my codebases as this allows me to capture information around the decisions I make so I have notes to review later should I have to refactor my code. So I created a new ADR to capture the decision to change the existing data model which was implemented by building a set of classes for each entity in TypeScript and building a GraphQL schema with those objects, using code generation tools to build types that would be usable in TypeScript instead.
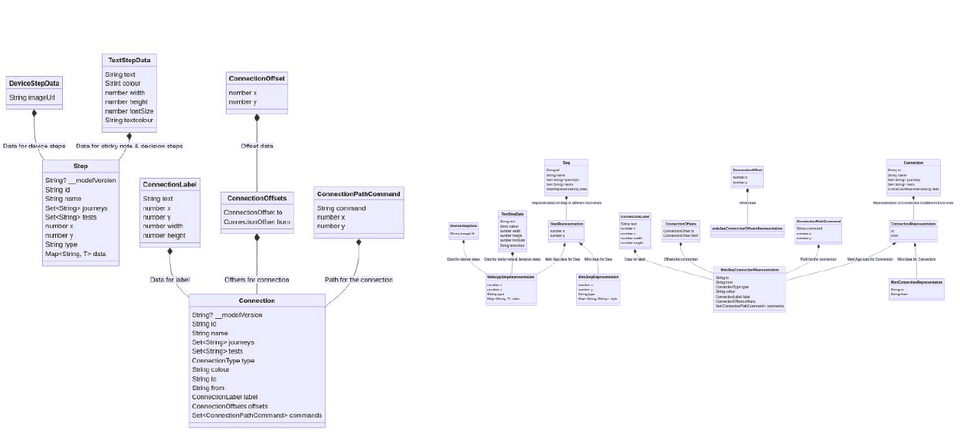
As part of the ADR, I captured the changes I would be making to the Step and Connection entities to allow for multiple representations of those objects to be defined so the system could support multiple front-ends.
I use Mermaid to define class diagrams so there’s a visual representation of the changes, as this is easier to understand.

When building the schema I used the graphql-schema-linter tool to ensure that my schema was valid (although I had to disable the rules related to Relay due to a naming clash with my Connection entity) and once the schema was built I spun up a local Apollo server to validate that the definitions were registering correctly.
Step 2: Getting Apollo Server running on Firebase Functions
With the schema built and verified that it was correct, I moved on to figuring out how to run a GraphQL server on Firebase Functions. I chose Apollo for this as it was with the GraphQL server that I had the most experience.
An initial search on Google for how to do this returned two approaches, one was to use apollo-server-express and then use this, as Firebase Functions are compatible with Express, and the other was to use apollo-server-cloud-functions which provides a wrapper over the other approach so there’s less code to write.
I went with the apollo-server-cloud-functions approach, following Fabio’s write up (https://medium.com/@piuccio/running-apollo-server-on-firebase-cloud-functions-265849e9f5b8) but because I’m using TypeScript in my Firebase Functions codebase I encountered an issue within apollo-server-express anyway as the type definitions for CORS were causing compilation errors.
In order to overcome the issue with the types in apollo-server-express I had to add skipLibCheck: true to my tsconfig.json which I found from this Github issue: https://github.com/apollographql/apollo-server/issues/927#issuecomment-445537360
Once I resolved the types issue I was able to get the Apollo Server running on the Firebase emulator (installable via the firebase-tools package) and after copying in my GraphQL schema and implementing some dummy resolvers I was able to use the Apollo Sandbox Explorer running against the emulator’s URL for the Apollo endpoint to test the API.
1/**2* Works with apollo-server@3.6.1 apollo-server-cloud-functions@3.6.1 firebase-functions@3.11.0 typescript@4.5.43* You'll need to add `skipLibCheck` for this to work as cors middleware types seems to have an issue in apollo-server-express4*/5
6import {ExpressContext, gql} from "apollo-server-express";7import {ApolloServer,Config} from "apollo-server-cloud-functions";8import * as functions from "firebase-functions";9
10const books = [11 {12 title: "The Awakening",13 author: "Kate Chopin",14 },15 {16 title: "City of Glass",17 author: "Paul Auster",18 },19];20
21const typeDefs = gql`22 type Book {23 title: String24 author: String25 }26 type Query {27 books: [Book]28 }29`;30
31const resolvers = {32 Query: {33 books: () => books,34 },35};36
37const graphqlConfig: Config<ExpressContext> = {38 typeDefs,39 resolvers,40};41const server = new ApolloServer(graphqlConfig);42const handler = server.createHandler();43// Have to cast to any as although the createHandler call will return a function with req, res args TS throws a wobbly44exports.graphql = functions.https.onRequest(handler as any);Step 3: Making the GraphQL schema more useful
While the schema used by the GraphQL server is great for allowing API consumers to know what to send and what they’ll receive, that schema would be even more useful if the application code itself could use the entity types in order to catch errors sooner.
Fortunately, there is a means to do this by using a tool called graphql-codegen which takes a GraphQL schema and converts it into code. For my use case, I just needed to generate a set of types that I could use within my TypeScript code but there is a multitude of ways the schema can be used using the tool.
In order to generate the types I needed, I ended up configuring graphql-codegen to create a types.d.ts file that included the operations and resolvers.
1overwrite: true2schema: "schema.graphql"3generates:4 ./types.d.ts:5 plugins:6 - "typescript"7 - "typescript-operations"8 - "typescript-resolvers"Once I had the types generated from the schema the next step was to publish both the schema and the types so they could be consumed by downstream services such as my Firebase Functions code, the web app, and the Miro plugin.
To do this I made sure both the schema file and the generated types.d.ts were at the repo’s root (i.e. not under a directory) before adding them to the files array in package.json. This would mean that when running npm publish both files would be packaged up and accessible from the root of the library.
1{2 "name": "@your-org/graphql-schema",3 "version": "0.0.1",4 "description": "GraphQL Schemas for generating types",5 "main": "schema.graphql",6 "types": "types.d.ts",7 "files": [8 "schema.graphql",9 "types.d.ts"10 ]11}Step 4: Loading in the GraphQL schema from the library
After getting the schema and types published as a library to consume downstream the next step would be to import the schema from that library in the Apollo Server config used by the GraphQL Firebase Function.
In order to load the schema from a file and use it as the typeDefs value of the Apollo config I needed to import GraphQLFileLoader from the @graphql-tools/graphql-file-loader library and pass an instance of this into the loaders argument for loadTypedefsSync from the @graphql-tools/load library.
1import {loadTypedefsSync} from "@graphql-tools/load";2import {GraphQLFileLoader} from "@graphql-tools/graphql-file-loader";3
4const sources = loadTypedefsSync("node_modules/@your-org/graphql-schema/schema.graphql", {5 loaders: [new GraphQLFileLoader()],6});7
8const typeDefs = sources.map((source) => source.document);9
10const resolvers = {}11
12const graphQLConfig = {13 typeDefs,14 resolvers,15}Step 5: Authenticating a user
Aside from one or two exceptions most of the operations that the API I’m building would handle require the user to be authenticated so the back-end can work with the records they have access to.
In the back-end alpha implementation, any need for authentication was handled by using requests.onCall functions as these would handle the authentication and provide the authentication data to the function via a context object.
In the front-end alpha implementation, these functions would then be called using functions.httpsCallable which is part of the Firebase SDK. This takes care of any authentication needed by the front-end code.
The alpha implementation’s reliance on the Firebase SDK meant that I didn’t have an existing implementation for authenticating outside of that SDK. Luckily the Firebase admin SDK provides a means to create JWTs for a user and a means to verify those tokens when they’re used to authenticate.
The Apollo server isn’t defined as a normal Firebase Function so I couldn’t just add a check to the start of the Function implementation, instead, I would need to use the context property of the Apollo server config to define a callback that could check the authentication and add any relevant values to the Apollo context that could be used by the resolvers later on.
This Apollo context came in quite handy for not only getting the user’s ID from the JWT but also for giving the resolvers access to the Firestore instance that was created in the top-level functions module as this allowed for the code to be split up for easier maintenance.
Creating a JWT
The Firebase admin SDK has an admin.auth().createCustomToken function that can create a JWT that can be used to authenticate a user. The function can be passed a set of user data to generate the token with the minimum requirement being that the user’s ID is provided.
Verifying a JWT
Within the GraphQL context callback, the JWT can be accessed from the request object passed to the callback via the request.headers.authorization path.
The function to verify the JWT requires the string to only contain the token so when reading the authorization header you will need to strip out the Bearer part of the string.
The Firebase admin SDK has an admin.auth().verifyIdToken function that will decode the JWT into an object that you can read the encoded values from so. The user’s ID would be available under the uid property of this decoded object.
1import * as functions from "firebase-functions";2import * as admin from "firebase-admin";3
4admin.initializeApp();5const db = admin.firestore();6
7async function getAuthToken(request) {8 if (!request.headers.authorization) {9 return null;10 }11 const token = request.headers.authorization.replace(/^Bearer\s/, "");12 return token;13}14
15async function getUserIdFromGraphqlAuth(request) {16 try {17 const token = await getAuthToken(request);18 if (token === null) {19 return null;20 }21 const payload = await admin.auth().verifyIdToken(token);22 return payload.uid;23 } catch (err) {24 return null;25 }26}27
28const typeDefs = '' // this would be loaded from GraphQL schema file29
30const resolvers = {31 Query: {32 getMyMaps: async (parent, args, {userId, db}) => {33 if (userId === null) {34 return {35 message: "UNAUTHENTICATED",36 };37 }38 // example of using the userId and db values39 const maps = await getMapsForUser(userId, db);40 return maps;41 },42 },43 Mutation: {},44 MapListResponse: {45 __resolveType(obj) {46 if (typeof(obj.message) !== "undefined") {47 return "ApplicationError";48 }49 return "MapListResult";50 },51 },52};53
54const graphqlConfig = {55 typeDefs,56 resolvers,57};58
59const graphqlServer = new ApolloServer({60 ...graphqlConfig,61 context: async ({req}) => {62 const userId = await getUserIdFromGraphqlAuth(req);63 return {64 userId,65 db,66 };67 },68});69const graphqlHandler = graphqlServer.createHandler();70exports.graphql = functions.https.onRequest(graphqlHandler);Emulator gotchas
The JWT created via createCustomToken cannot be verified by verifyIdToken as the aud property is different than verifyIdToken is expecting. In order to create a token that has the correct aud property there’s an additional call that needs to happen that will produce a JWT that can be verified.
Once you’ve generated the JWT via createCustomToken you need to send that token as part of a POST the /www.googleapis.com/identitytoolkit/v3/relyingparty/verifyCustomToken endpoint available via the authentication emulator, which when you set returnSecureToken to true will return a JWT that will work correctly. The code in the next step shows how to do this.
Step 6: Testing everything works
Now authentication is set up in Apollo it’s time to try out an example call but in order to do that we’ll need to create a user, create a JWT token to authenticate them with, and create some test data to return.
If you’ve not already enabled the authentication or Firestore emulators then you can run firebase init and select the additional emulators to install.
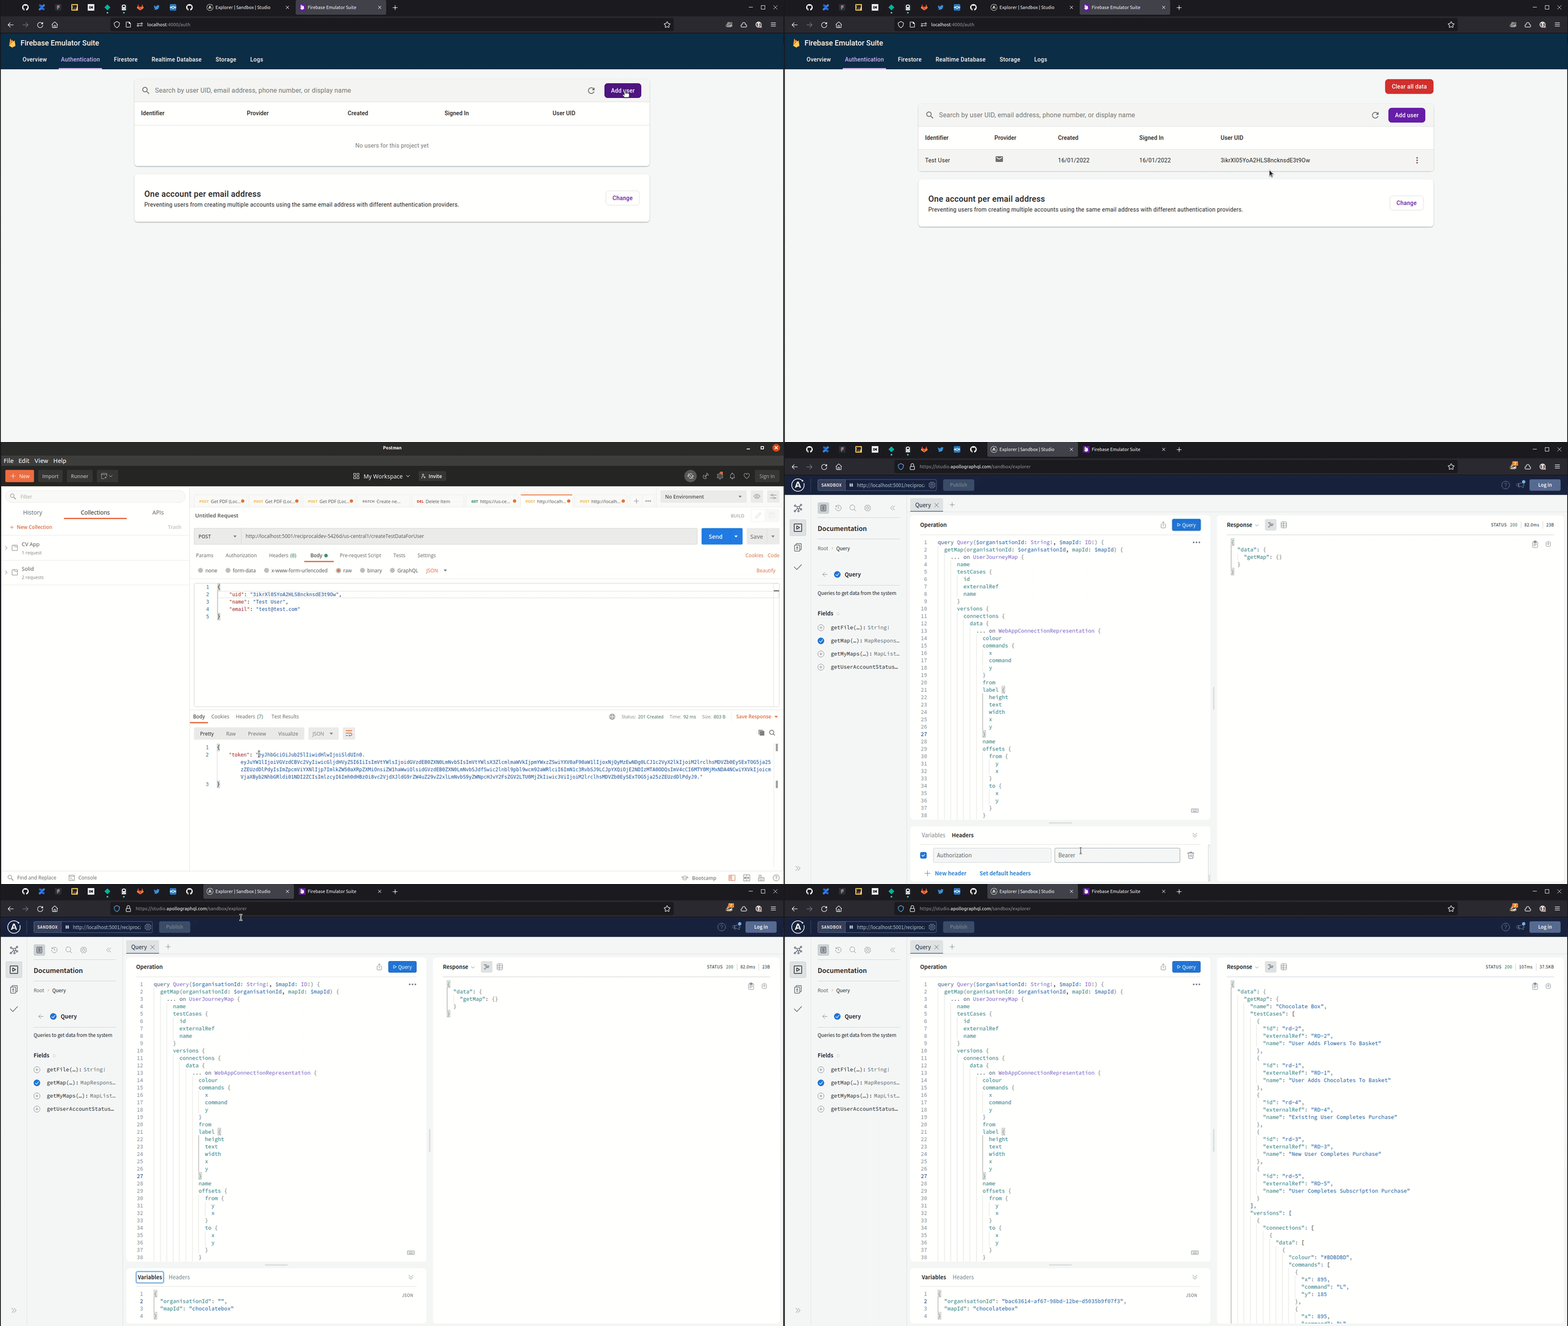
Under the authentication emulator, you’ll be shown a list of users with an ‘Add User’ button that when pressed will show you a form to create a new user. You can create a new user by providing an email address and password.

Once you’ve created a user you’ll have a user in the system you can create a JWT for using createCustomToken but you’ll need to provide the user’s UID to that function and the created token will need to be converted to an emulator accepted token via verifyCustomToken .
To make things easier for myself I rolled the token management and the test data creation into an endpoint I could send the user ID to and that would return the emulator-friendly JWT.
1import * as admin from "firebase-admin";2import axios from "axios";3
4admin.initializeApp();5const auth = admin.auth();6
7const FIREBASE_TOKEN = 'This can be found in the firebase console under Web API Key on the settings page'8
9exports.createTestDataForUser = functions.https.onRequest(async (req, res) => {10 const {uid} = req.body;11 try {12 await createNewUserMap(uid, db); // Function to seed data13 const token = await auth.createCustomToken(uid);14 const authResult: any = await axios.post(15 `http://localhost:9099/www.googleapis.com/identitytoolkit/v3/relyingparty/verifyCustomToken?key=${FIREBASE_TOKEN}`,16 {17 token,18 returnSecureToken: true,19 }20 );21 res.status(201).json({22 token: authResult.data.idToken,23 });24 } catch (err: any) {25 res.json({26 error: err.message,27 });28 }29 return;30});I then used the returned JWT to set the Authorization header in the Apollo Sandbox Explorer UI (at the bottom of the Operation panel there’s a means to provide variables and headers).
After providing some variables needed by the query I was looking to run I was able to successfully execute an authenticated GraphQL call against the Apollo Server running on the Firebase Functions emulator.

Summary
Running GraphQL on Firebase is relatively straight forward but authentication requires a little more work if you’re looking to test things locally via the Firebase emulator.
By moving from using the Firebase SDK to interact with Firestore to implementing an API to do this we’ve now got a lot more flexibility on how we refactor the app and how we’ll grow Reciprocal.dev.
By using the graphql-codegen tools I’m able to have one source of truth for the entities in my application via the GraphQL schema and then generate code to help downstreams use those entities such as the type definitions for TypeScript.