Building My First App — JiffyCV
— Product Development, Lessons Learned — 17 min read
My first ever app — JiffyCV — is now live! Here’s the story about how it came to be, the approach I took to make it and what I learned along the way.
The imaginative spark
I originally started looking at building some form of tool to assist job hunting in 2016, after the startup I was part of closed down and I found myself struggling to remember what I’d done in the last five years and what to include in my CV.
The idea I had then was to build a Kanban tool, similar to Trello that helped keep track of the jobs you applied for, allowing the user to upload the CV they submitted and to create interview notes from that CV.
I then started looking at a means to create CVs, allowing the user to create different versions so they could have multiple CVs created from a combination of versions.
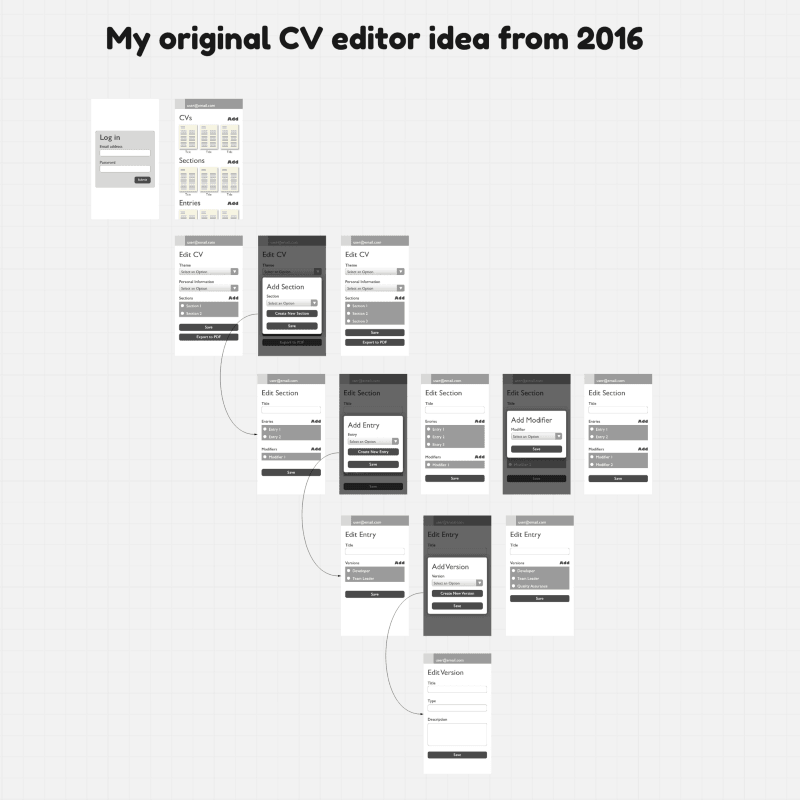
I ditched that idea after I pitched it to some ex-colleagues who pointed out the many flaws the idea had and I ended up getting a new job shortly after meaning I had no time to iterate on the idea.
Skip forward a few years and in late 2019 I was working on a React Native app for a gaming community organisation that I had volunteered for, putting many hours into building it, but unfortunately the app was binned as the game that the community was built around released something similar.
So I decided at that point, given the knowledge I gained and the fact that I was back in my old university sleeping pattern (I did 35 hours at a job while also doing my BA full time so I didn’t get much sleep) that I was going to build my own app so I didn’t waste my time working on something that never delivered any value.
I spoke to some friends at work and asked them if they’d be interested in helping out as they had skills and experiences I felt might help me understand the target audience better and we assembled a team.
Deciding what to build
As a team, we knew we wanted to build something in the job hunting space and I’ve worked with FRESH and JSONResume making it so it was easy to create CVs and update my LinkedIn profile, but I wasn’t sure this alone would have legs as a product.
To validate our initial ideas we created a survey and asked contractors, full-time employees and unemployed people in our network what the pain-points of the job hunting process were.
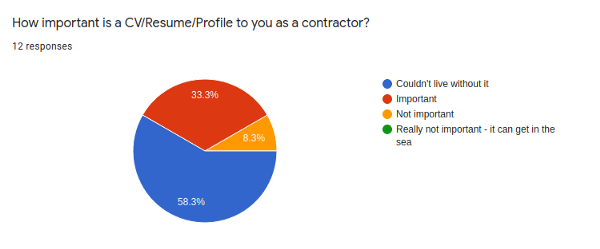
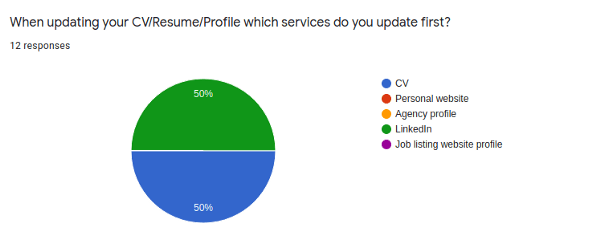
The top responses were how annoying it is to maintain multiple CVs, keep LinkedIn up-to-date and dealing with recruiters asking you to duplicate your CV for their needs.
These problems sounded exactly like something we could solve and I started to see how some of the solutions to those problems overlapped and we could build something ‘disruptive’, however there were steps we needed to make to enable that and as a 4-person team we’d have spent ages building something and most likely missed the boat by the time it launched.
The final scope for a MVP was decided upon in May 2020. We’d build a CV editor app that sets up the data structure for the work further down the line but proves the value of the idea in a usable application that meets one of the pain-points our target user group has — Maintaining multiple CVs.
The MVP app would also introduce the concepts of the greater solution such as the Experience Collection where the user’s achievements, job history, education etc would be collected with functionality to allow the user to have different representation of these experiences, and how creating a CV would then be a case of deciding which entries and representations to include.
A post-MVP roadmap was also drawn up, detailing the additional functionality we’d release scoped to the resources we have available to us (although I imagine should we strike gold that roadmap will change somewhat) but implementing the groundwork for the loftier ideas we have.
Getting my crayons out
The team originally had a graphic designer who would have assisted in creating mockups and the final UI but they had to bail pretty early on so I took on building the mockups we’d use for user testing.
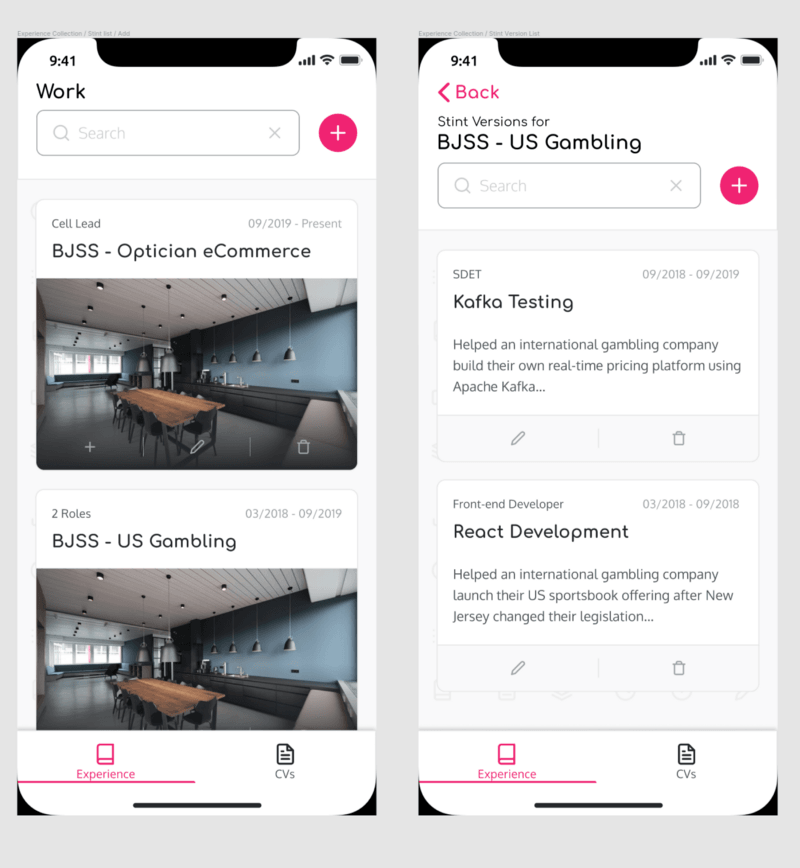
In order to build the mockups I used Figma, a tool that was new to me. I’d used Sketch in the past but I moved to using Linux during this time as I decided the browser based tool would allow for greater portability and sharing.
I wouldn’t say I’m a great UI designer, I understand grids and typography but colour and artistic flair are things I struggle with so I bought a pre-made design system for about £50 and used that to build my own design system for use in the app and started building mockups.
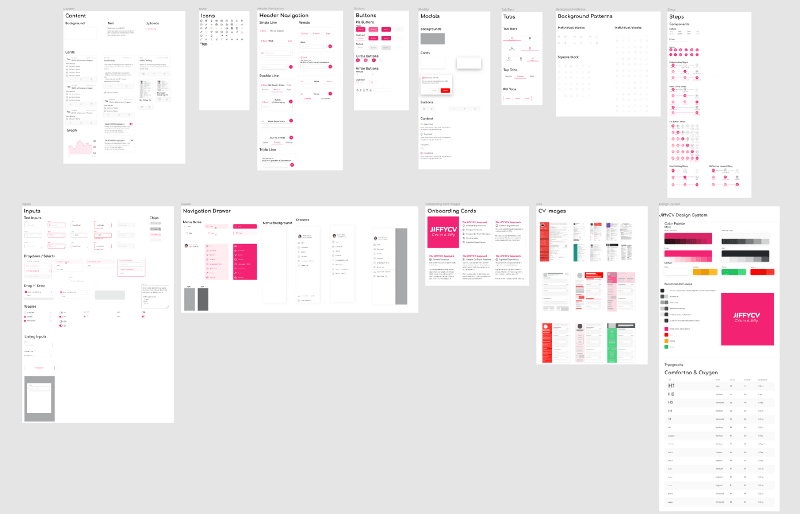
Figma’s built-in prototyping tools were a godsend for me when building mockups. In the past I’d used Marvel but they only allow 2 projects and the export from design tool to Marvel makes it hard to iterate quickly, with Figma you can design the user journey, prototype it and jump right into proving it’s usability all within one app.
Usability testing
Showing people mockups of my idea, having them try and use it and listening to feedback is one of the most terrifying but also rewarding experiences I’ve had during this project.
I felt completely out of my comfort zone, I’m by no means a UX designer and there were a bunch of iterations I had to go through in order to create something people could use but I got there in the end and it turns out most people grasped the idea of having an Experience Collection from which you create CVs and many suggested ways to build off the concept.
The ideas that came out of the usability testing went onto the portfolio backlog for the app and some actually changed the roadmap as there were stronger ways of providing the value than we had come up with.
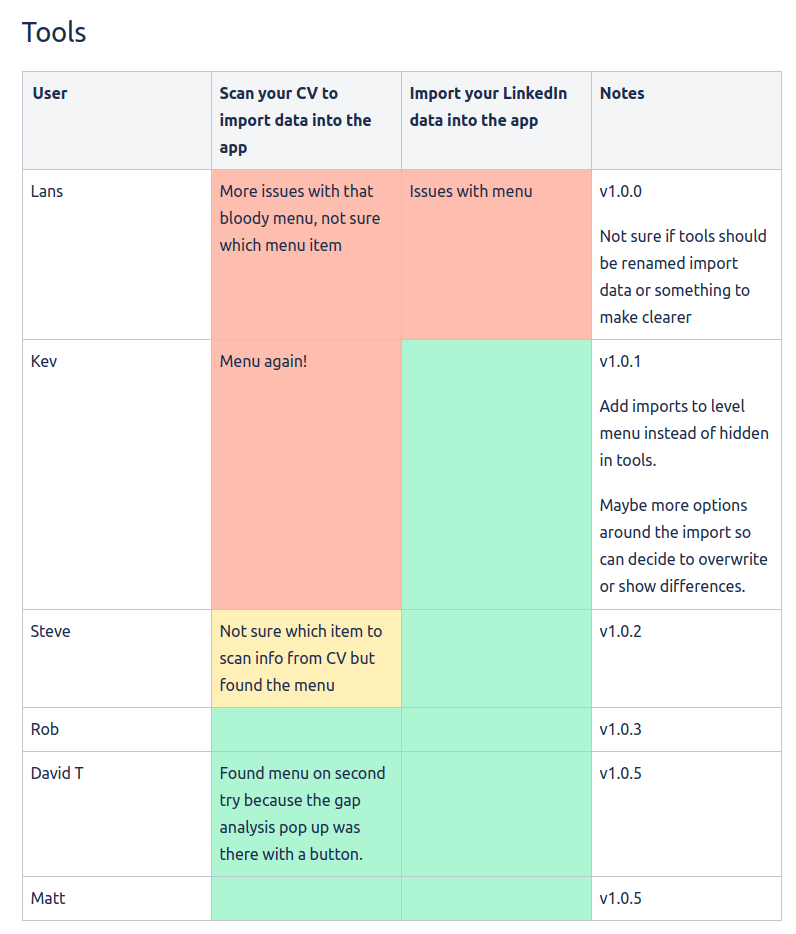
After many iterations of usability testing I felt that the core journeys of the app were in a place that most people would be able to use easily and so I started writing user stories to codify my findings and build acceptance criteria for the stories.
Writing user stories
I’ve helped write user stories in the past but I’ve never really been happy with the way they’ve come out from a testing point of view. The acceptance criteria (AC) is usually written in Gherkin and that opens up a whole bag of issues that I was keen to avoid with JiffyCV.
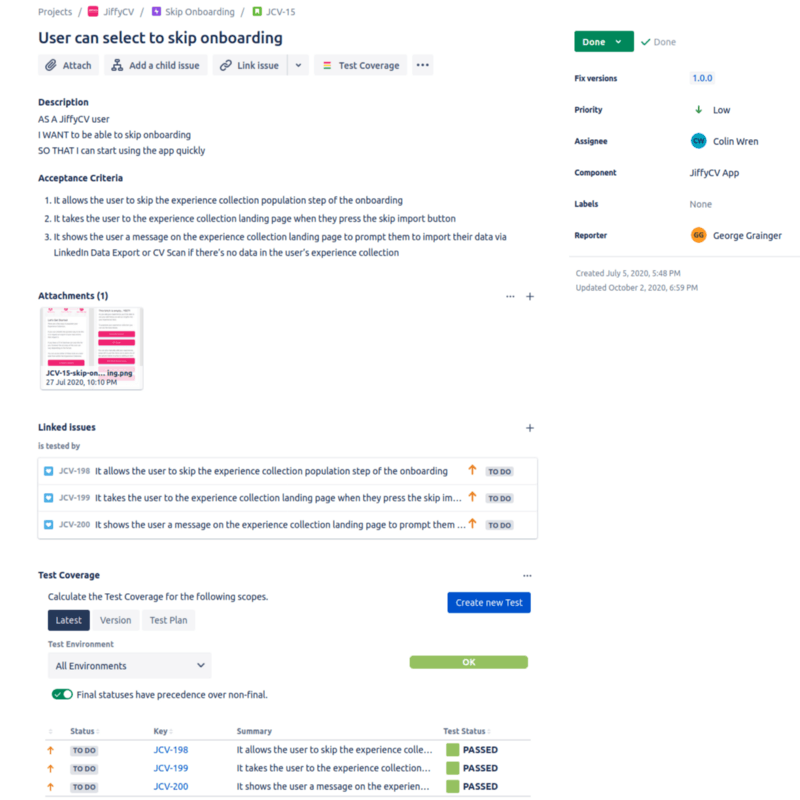
I’m a really big fan of the spec format for defining ACs as I find it gets straight to the point, and I was keen to use bi-directional traceability for the user stories so I could use those user stories as the single point of truth for the definition and verification of the app’s behaviour.
I used the screens from my mockups to illustrate the flows and to aid discussion about what the story was enabling the user to do.
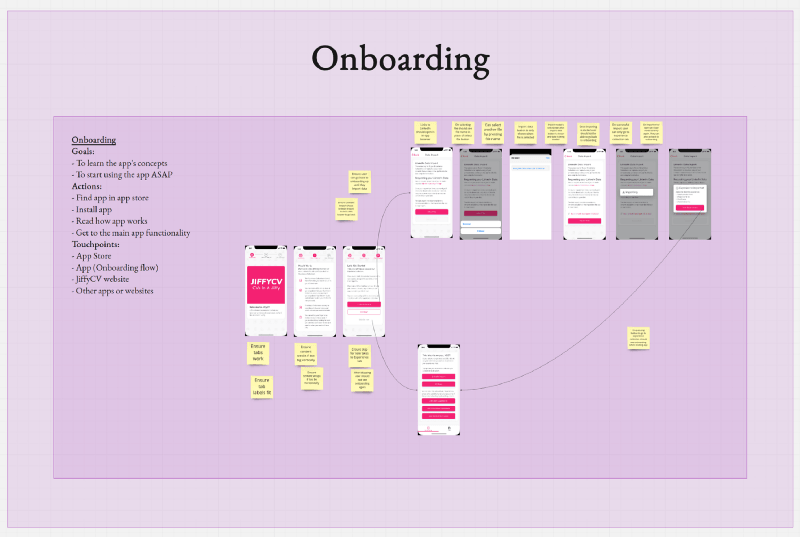
Later, I moved to use Miro for mapping the user journeys and laid out every permutation of the journey the user could take as this made it easier to see any gaps in stories as well as gaps in test coverage.

Once I had a healthy, well groomed backlog and a roadmap I was happy with it was time to start coding.
Starting development
I decided to build JiffyCV using Expo. I had used it in the past and it makes working with React Native so much more pleasurable as you can publish the app’s assets to Expo’s servers and have others with the Expo Client download it to test as you develop.
The Expo build service is also a great productivity boost as it means you don’t have to worry about maintaining a CI build server (or worse still a manual one like on a previous React Native I worked on where the build server was an old Mac in someone’s closet).
Architecturally we split the app’s underlying functionality into 4 different concerns:
- Data entity library— How we’d structure the data to allow for the future plans while also making it flexible enough to work with as we built and learned from the app
- React Native component library — The UI elements and interaction patterns that the app would use to help the user achieve their goals
- ReactDOM based template library — The HTML templates we’d use to show the CV preview and generate PDFs
- React Native app — The app that uses the other three libraries together to allow the user to achieve their goals
Each library would produce an npm package we could bring into the React Native app, allowing us to build these independently and to use the technologies we wanted for development but removing these from the final artefact.
Building our own data structure
As mentioned previously I’ve had experiences building my own tooling using the FRESH and JSONResume JSON schemas for defining a resume so the initial plan was to use these to achieve our goals.
Unfortunately as we looked at the needs of JiffyCV it became clear that we would have to build our own, so we did an in-depth dive into both schemas and also the schema of the LinkedIn data export archives and picked the best parts from these and augmented them with our own concepts such as entry versioning.
I left my colleague Luke to take this on while I worked on the more UI centric work. I was blown away by how elegant the solution was that Luke produced as it handled every case we’d need while we grow the app but was easy enough to use for the basic functionality in the MVP.
The data entity library also sold me on TypeScript, something I wasn’t really wanting to use as I worried having to deal with types would end up costing us more development time than it saved, but I’ve been proven wrong.
Building the React Native component library
I’ve built component libraries for React Native projects previously so I was more in my comfort zone here compared to the usability testing.
This time as I was running the show I invested my time in building automation testing into the component library development process (something I’d been told not to waste time on previously).
This meant that not only did my component library allow me to document the component’s look, props & behaviour but I was able to build up the atomic pageObjects that tested it alongside and manage both in own release of the component library.
I had to tackle some issues around automation with Expo which didn’t seem to have much in the way of documentation, you either used Detox with an ejected project or you built a standalone app and ran the automation against that.
I decided to use Appium for the automation in the end, Detox was too flaky for my liking and once I was able to use Appium against the Expo Client I was able to start validating the pageObjects worked.
I found a means of using deep links to get Expo to boot the project in the Expo client and run the automation against that to allow me to test it locally without the need to build anything else. This worked really well and built the foundation of the test automation on the project.
Using React DOM in React Native
The last library I built was the templates for rendering in the CV preview, this required being able to take a ReactJS website and rendering it into static HTML to be passed to both a WebPreview component in React Native and Expo’s printing library to generate the final PDF.
I decided to build a library for this as it allows me to develop the templates in a ReactJS environment and expose the functionality to generate the static HTML via React DOM as the libraries entry point.
This means that development and testing of the templates happens outside of the React Native context allowing me to use tools like Selenium that give me feedback far quicker than something like Appium while also exporting my pageObjects for use in Appium when testing JiffyCV.
Pulling these together to build the main app
Thanks to the separation of concerns brought by the modular approach we used the app only needs to deal with navigation and the logic behind each screen.
This has made it incredibly easy to build, refactor and test as the majority of the components that are needed within the app are just wrappers around the components from the component library. The callbacks are just calling methods on the data entity classes and to render a template we just import the function from the template library.
That being said there has been one major gotcha that wasted a lot of time and that was peer dependencies.
In September 2020 Expo released version 39 of their SDK, something I was keen to upgrade to in order to show how effortless Expo made the upgrade progress and thus proving that the trade off of app size vs developer productivity was worth it.
Unfortunately for me because npm v6 doesn’t install peer dependencies I ended up making the mistake of installing them as part of the CI process and as soon as the version of React Native was upgraded the app started acting weird.
It turns out the app was essentially running two versions of React Native because of my npm install react-native I added to the CI but as the cause of the issue was buried in the CI script to package the library I lost a lot of valuable time debugging and essentially stripping the app completely and building it back up to figure out what caused the crash.
Automated testing
The automation framework I settled on was Appium and Webdriver.io, however I decided to use Jest for the test runner as this was the test runner I used for the unit tests and also it meant I could re-use a lot of the environment setups I was using elsewhere.
I published the page objects from the component and template libraries as part of their npm packages so that the same pageObjects used to test the UI elements in those projects could be used to drive the automation in the main app.
This allowed me to focus purely on the organism and page level atomic page objects as I had already modelled the lower level page objects in their respective projects.
With the acceptance criteria (AC) for the user stories written in a spec structure I was then able to use Jest to define my tests cases using the AC with each test cases validating a single AC.
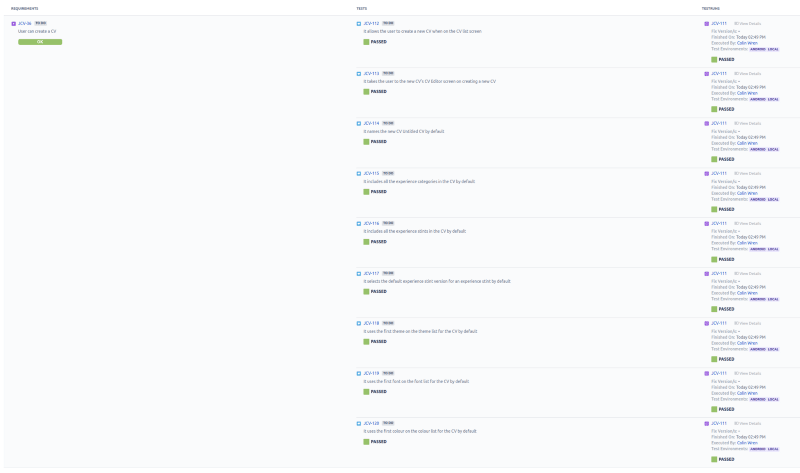
I then used Xray (a plugin for Jira) to automatically import my test results into Jira and link the test run to my user stories, giving me a list of ACs with nice green ticks on them as a I worked through it.
Unfortunately my set up wasn’t perfect. As the app got more complex I encountered an issue with iOS where if the React Navigation stack was more than four levels deep, then the XCUITest framework could no longer access the nodes underneath.
This bug made iOS automation unusable and after timeboxing a fix I just had to cut my losses and run a manual test suite but as my test cases were automated I was able to re-use a lot of the tools and flows I built into the automation to make my manual testing easier.
Continuous Integration
With the React Native pulling in multiple libraries it was important that there was a continuous integration (CI) process to ensure that I didn’t inadvertently push a breaking change and lose time debugging and releasing a new version (this made the double React Native version issue more ironic).
I decided to use Github Actions for the CI as I was already using Github to host my npm packages so having one place for everything made the most sense.
The CI setup is pretty basic, I have unit tests running and use Code Climate to keep track of the code quality metrics but this enough to ensure a base level of quality and provide fast feedback.
This project was my first using Code Climate and so far I’m impressed. I’ve used Codacy and SonarQube for open source projects previously but they charge for private repos so I had to find an alternative. Luckily Code Climate has a start up account option so I was able to use this for my code quality checks.
I’ve been completely unable to get my automation running in CI though, I’ve yet to find a decent free-tier offering from device cloud providers with them providing out of date devices to use or charging way more than I can justify.
I had looked at Amazon’s offering as they offer 2000 minutes on their free tier but because of the mechanism it uses to run the tests it would have meant my test reporting setup would have been rendered useless.
I did attempt to run the Android automation on Github actions using a headless emulator but in doing so I burned through all the CI minutes for the team and had to buy more. In the end I just decided to run them locally before push.
Once the tests pass and the code is on the main branch I then use the CI to handle the releasing of the app and it’s assets using Expo’s CLI tooling.
Getting ready for beta
Once the app was in a state that we felt confident putting in people’s hands we started making the app production ready. This included making sure we captured errors and making the app localisable to increase the number of markets we could launch in.
Monitoring
When running the app in the Expo Client you get a lot of useful feedback when the app encounters warning and errors but this isn’t available in production so we needed to have a means of being notified of these errors and enough information to help us diagnose the issue.
I set up Sentry for this. I’ve used Sentry in previous projects and they give you a decent amount of events for free. This deal was sweetened when I found out that Expo has a hook to manage uploading source maps to Sentry after publishing new app assets.
The release information that Expo provides to Sentry needed a little bit of work for our needs though as I wanted to be able to filter the errors by environment of dev, beta and prod but Expo would set everything to production so I added some configuration to manage this.
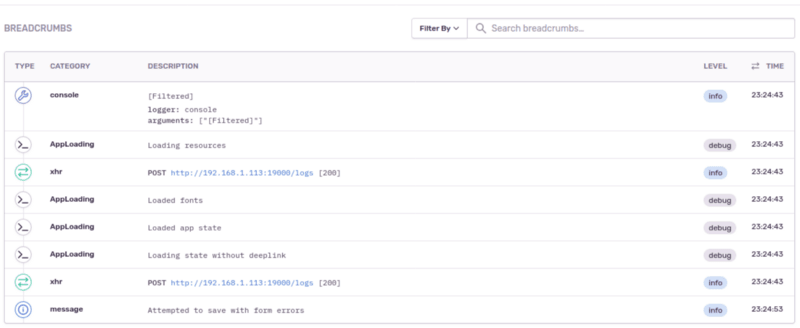
Tracking down bugs by stack trace alone isn’t easy so I made use of Sentry’s breadcrumb functionality. Breadcrumbs allow you to build up information about the user’s journey through the app as they use it and then when Sentry captures an error it includes this journey information.
The use of breadcrumbs meant that I’m able to pull together a clear set of steps for reproducing bugs that come out of the beta testing phase and saves a lot of going back and forth with the beta tester to understand what exactly went wrong.
One thing to note is that including Sentry will affect your iOS privacy information on your app store listing, I’m collecting anonymous logs so I was able to get away with just usage and diagnostic data being recorded but if you include user identifiers then you may find this impacts your App Store listing.
Localisation
The teams primary language is English (though it could be argued that I don’t even speak that properly) so localisation was something that we didn’t really think about until we looked at the markets we wanted to target and we started reviewing the copy in the app.
Expo’s preferred way of handling localisation is to use expo-localization and i18n-js together with expo-localization used to determine the user’s locale.
It was a pretty long task to extract all the strings from the app and move them into a central location but it allowed me to see duplications and lead to further refactoring as I had some areas of the code where I could have used enum instead of strings.
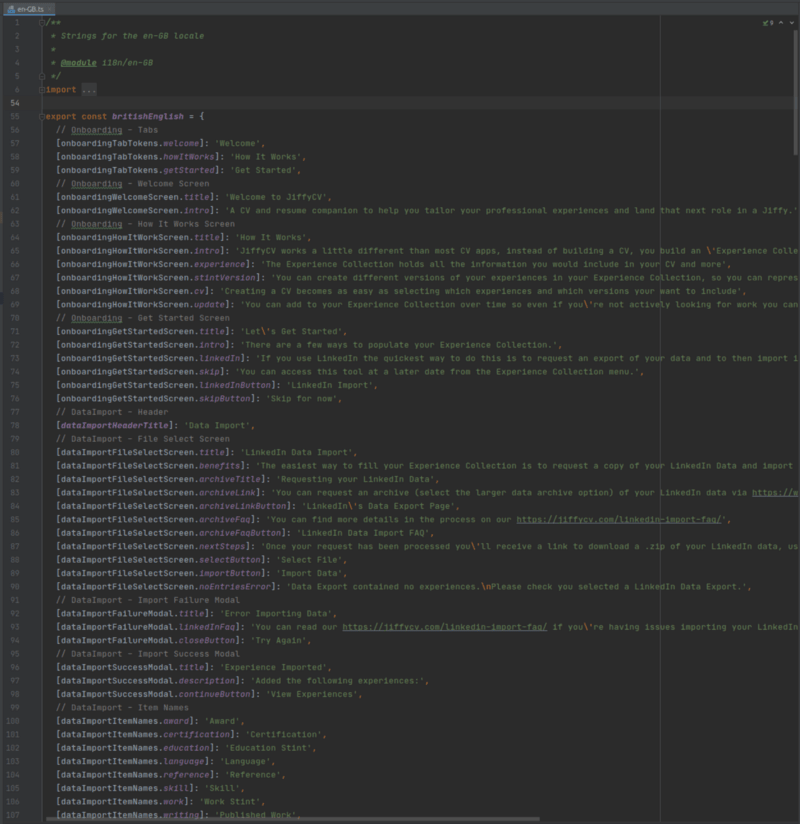
I found you can make the localisation code easier to work with by tokenising the keys used for the translation strings so these are dynamic and makes it easier to modularise the code, I also built up a hierarchy of these tokens so it was clear which screen the key belongs to.
Using this approach your translation files just import the keys and define the string to use for that given language and with the keys following a hierarchy you can still understand exactly where that text is used.
Release Process
The release process is arguably the most important aspect of launching a beta to get right as you’ll need to be able to make changes and ship those changes to the beta testers as quick as possible.
Expo’s background app asset refresh functionality really shines here as it means you don’t have to build another binary to upload to the beta testing tooling used by the App Stores.
You can also publish the assets to different channels so we decided to create two channels — beta & default, with default being the channel that would be used by the final app.
In order to use the channels however you need to have different standalone apps that are created to pull in assets from those channels, this means that we’ve had to create two separate apps — one for beta testing and one for production.
This complexity means that using a CI server to build these was critical to prevent mistakes being made and so that multiple jobs could be kicked off at once.
We opted for the following process:
- A push to main branch (or a PR merge) would publish the app’s assets to the beta channel, making this available to beta testers via background app asset refresh
- A tagged release would publish the app’s assets to the default, making this available to the production users via background app asset refresh
- A manual trigger would start the building of the standalone beta apps and publish these to the appropriate beta testing tools
- A manual trigger would start the building of the standalone productions apps and publish these to the appropriate app stores
The app asset publishing tasks forms part of the usual development process as these will be the most commonly used while we could use the manual triggers to automate the creation and uploading of the standalone apps as we needed them.
It’s worth noting that while background app asset refresh is great for getting new functionality into the hands of users you will still need to create a standalone app with this version and put that in the stores to ensure that new users who download your app get the updated assets as part of that download.
App store gotchas
Building the app is a really enjoyable experience but dealing with the app stores feels like pulling teeth, especially with Google who seem to make it really awkward to set up a simple beta test to get feedback on a paid app.
Here’s some of the things that tripped us up trying to get into beta:
- On the Play Store if you want to sell a paid app you will need to supply your beta testers with a promo code to install the app free of charge, otherwise they’ll be asked to pay for it
- You can only create promo codes in the future so if like us, you find out that Google is trying to charge beta testers those beta testers will have to wait a day for the promo codes to be usable
- In order to allow beta testers to download your app via Play Store you’ll need to add the email address they use for the Play Store to an email list otherwise the promo code they receive will tell them it’s already been claimed
- In your
app.jsonmake sure you set and increment yourexpo.android.versionCodeproperty otherwise Play Store will not allow you to upload new versions as it thinks it’s the same binary - You need to have all your app store copy and images ready for Play Store before you can upload your app to start beta testing and you have to do this in one go (the form doesn’t allow you to save progress). This held us up massively, with TestFlight you can upload the app without needing this information
- Don’t even bother with the Play Store Internal Testing, go straight to Closed Testing
- While you can automate the uploading of your standalone app’s .ipa to TestFlight to create a new build you will need to add that build to the list of builds available to the beta testers via the web UI
- Keep an eye on your TestFlight feedback, we had asked people to use a forum to give us feedback on the app but most people did it within TestFlight so this almost got missed
- Google updates their UI constantly so be prepared for things you read on their support pages and other websites to not match what you see
- If you have functionality in your app that requires a prompt to ask the user for access you will need to ensure your iOS config in
app.jsonincludes the relevant strings for this or your app will be rejected.
Going into production
The beta feedback was really positive and there were a few people who saw how the concepts the app used could be applied elsewhere which tells me we did something right at least!
It’s always a little panic-inducing when you sink half a year into building something and then have to show that to the world but spending time in analysis and using tools like Expo Client that allow you to share the in-development app with others is a good way to ensure you’re on the right track.
After wrapping up the beta with a beta tester survey to understand the features people liked and what they would like to see in the future we started getting ready for production.
This involved setting up new CI pipelines for deploying the app into the stores with a different configuration and adding some more monitoring metrics we wanted to capture based on gaps we saw during beta testing.
Just after Christmas we sent the app for approval and after Apple rejecting the app due to a permissions string being missing we were in the stores just after New Years day.
In order to tie in with potential user’s new year resolutions we set up a sale to run from the 4th of January to sell the app at a reduced price which is helping a little to get some traction in the app store.