Enhancing Your Miro Boards By Building Your Own Miro Web Plugin
— JavaScript, Technology — 5 min read
Miro is an amazing tool, I’ve been using it for about 3 years now and I love it.
Miro’s strength is that it, much like the physical whiteboard it’s emulating, can hold anything which makes it really powerful for collaboration and big picture work.
My team have been using it to aid visualising the ‘as-is’ and ‘to-be’ for the work our client is requesting, using images to visualise the user journey with loads of arrows and stickies to pinpoint areas we need to build an understanding in.
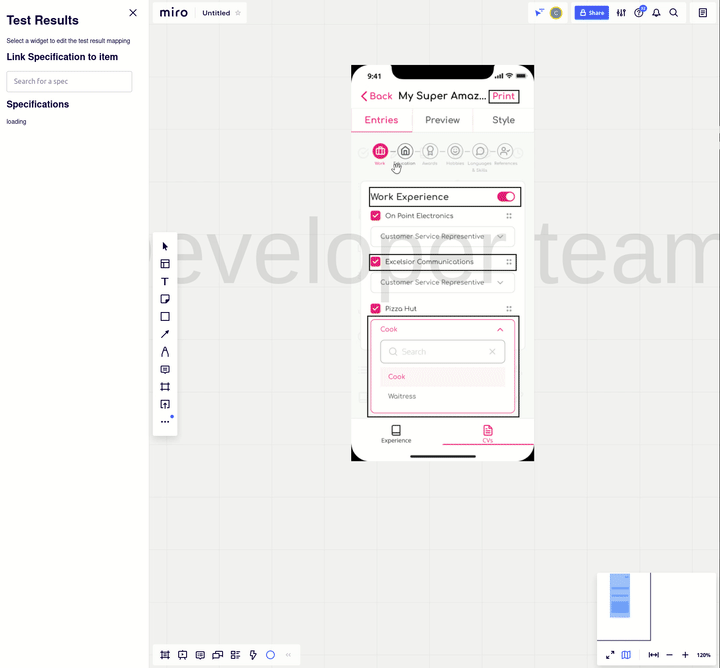
This works well, but I felt there was something missing from the conversation which was the output of our automated tests.
If we could have access to the test results from within Miro we’d be able to get a quick glance of test coverage, spot any areas where coverage needed to be increased and be able to see if the tests were passing. Essentially turning Miro into a living documentation tool.
So I set about building a proof-of-concept and over an evening managed to pull together a functioning plugin, using Glitch to host the files needed to power it and I’m really happy with the result.
Setting up a Miro web plugin
Before you start building anything you first need to set up your Miro ‘Dev Team’ account and create an app to install on your Miro account.
Creating a Dev Team gives you a special developer account which has the same limitations of the free account but this allows you to install your web plugin without impacting your main account.
Once you’ve created your Dev Team account you can then create a new app under that account’s Apps & Integrations section. This app needs to be set up to have the boards:read and boards:write permissions.
With the permissions set you then install the app onto your Dev Team account and take note of the OAuth access token this generates. This is only needed if you’re going to use the Miro REST API so even if you don’t think you need this, it’s best to save it.
Finally the last step is to set the ‘Web-plugin’ value for the app. This is the URL for the main HTML file that will act as the entry point for the web plugin. I used a Glitch ‘hello-webpage’ starter for this but you can also use tools like ngrok to make files on your local machine available.
With the app installed to your board and pointed to the entry point you’re now ready to start building your plugin. I’ll cover some basics on building a web plugin below but Miro provide a number of examples to get you started.
Working with the Miro web plugin SDK
Miro web plugins work by loading your HTML into an iframe and using postMessage to communicate between the iframe and the Miro app itself.
This means you’ll need to load the Miro SDK in your HTML entry point so it can be used to facilitate this communication. If you’re looking to build an interface for your plugin it’s also worth loading in the Miro CSS styles so your plugin meets the Miro UI standards.
As your loading HTML into an iframe you can build your app in any framework you’d like but I decided to build mine in statically served HTML and vanilla JS as this was quicker to get started with and I only needed to update a couple of elements on the page when the user interacted with the board.
Adding your plugin to the Miro UI
In order to have your plugin accessible to the user you need to first add it to the UI. There are a number of places in the UI you can add your plugin to but the common pattern appears to be the bottom bar.
You can add your plugin to the bottom bar using the code below and can define an icon to show and a callback to fire when the user presses the button.
1<!DOCTYPE html>2<html lang="en">3 <head>4 <script src="https://miro.com/app/static/sdk.1.1.js"></script>5 <script>6 miro.onReady(() => {7 miro.initialize({8 extensionPoints: {9 bottomBar: {10 title: 'Colin\'s Super Amazing Plugin',11 svgIcon: '<circle cx="12" cy="12" r="9" fill="none" fill-rule="evenodd" stroke="currentColor" stroke-width="2"/>',12 onClick: () => {13 // Load the sidebar.html into an iframe in the left sidebar UI. This html can bring in it's own JS files to handle interactions between Miro and the UI14 miro.board.ui.openLeftSidebar('sidebar.html')15 }16 }17 }18 })19 })20 </script>21 </head>22</html>As part of the callback you can tell Miro to open a sidebar which will load the defined URL into an iframe. The page that is loaded into the sidebar will need a copy of the Miro SDK too to handle the communication via postMessage but the use of the sidebar allows for more information to be shown to the user and in a dynamic fashion as it can be updated as the user selects widgets.
Interacting with Widgets on the board
Widgets are the name given to the entities (such as text, stickies, images etc) present on the Miro board.
The miro object of the Miro SDK allows for the setting up of event listeners which will be triggered when events such as the selection of a widget happen. You can subscribe to these events using the code below, supplying a function to call when the event is triggered
1miro.onReady(() => {2 // subscribe to the selection updated event3 miro.addListener(miro.enums.event.SELECTION_UPDATED, selectionCallback);4 // Process initial selection when plugin loads5 selectionCallback();6});At the time of writing the following events for widgets are available:
SELECTION_UPDATED— For when the user’s selection changesWIDGETS_CREATED— For when a user creates a new widgetWIDGETS_DELETED— For when a user deletes a widgetWIDGETS_TRANSFORMATION_UPDATED— For when a user updates the size of the widgetALL_WIDGETS_LOADED— For when all the widgets on a board have finished loading inMETADATA_CHANGED— For when the metadata on a widget is updated
For my simple app that showed information for the currently selected widget(s) I only needed to listen to SELECTION_UPDATED but I can imagine WIDGETS_DELETED would also be useful to listen to so records can be deleted when the widget is.
In order to get the list of selected widgets after the SELECTION_UPDATED event has triggered you need to query the board’s active selection using miro.board.selection.get() which returns a promise of an array of widget objects.
The widget object contains the id, position, sizing and transformation information for the widget along with properties that hold the actual data for the widget such as the text or image information.
You can check the Miro API docs for more information on the properties available on the different widget types.
1async function selectionCallback() {2 // Get the widgets that are currently selected on the board3 const widgets = await miro.board.selection.get();4 // process selection / no selection5 if (widgets.length > 0) {6 // Create an array of IDs for use in a function later7 const widgetIds = widgets.map((widget) => widget.id);8 // Create a sub-selection based on widget attribute such as type9 const imageWidgets = widget.filter((widget) => widget.type === 'IMAGE');10 // Process the widget selection11 await processWidgetSelection(widgetIds);12 } else {13 // if no widgets selected then restore sidebar UI to default state14 resetUI();15 }16}Once you have the widget you can change these properties and update them on the board using the miro.board.widgets.update function which takes an array of partial widget objects containing just the fields to update and the widget id.
If you need to change the type of widget being shown but want to retain the information then you can delete the old widget and re-use the values from it to create a new widget of the desired type.
This can be seen in the ‘Stickies to shapes’ example on the Miro developer docs but you can use these independently for your use case.
1// add event listener to convert button in sidebar.html2const convertButton = document.getElementById('convert');3convertButton.addEventListener('click', async () => await convertSelectedStickiesToShapes()); 4
5async function convertWidgetsToShapes(widgets) {6 // delete the old widgets7 await miro.board.widgets.deleteById(widgets.map((widget) => widget.id));8 // create new shapes from the widgets, re-using the text, position and dimension info9 await miro.board.widgets.create(10 widgets.map((widget) => ({11 type: 'shape',12 text: widget.text,13 x: widget.x,14 y: widget.y,15 width: widget.bounds.width,16 height: widget.bounds.height,17 }))18 );19}20
21async function convertSelectedStickiesToShapes() {22 // Get the selected widgets23 const widgets = await miro.board.selection.get();24 // Get the stickies widgets25 const stickies = widgets.filter((widget) => widget.type === 'STICKER');26 // Convert them to shapes27 await convertWidgetsToShapes(stickies);28}Notifying the user
If your operation takes a while then you might find yourself needing to inform the user that it’s completed successfully. You can use the miro.showNotification function to do this, providing the message to show as an argument.
This will show a toast like pop-up in the UI with the provided message.
Testing your plugin
In order to test the functionality within Miro the best means to do this is to create a board in your Dev Team account with a set of widgets in various different states so that you can work through a set of scenarios to test the functionality.
As the Miro web plugin is just loaded into an iframe though you can build your plugin using the development tooling that you normally use for web development and treat the iframe to host page postMessage functionality as the boundary for these tests.
In Miro’s app-examples repository on Github they’ve included miro.d.ts which can be used to help mock out the Miro SDK objects for unit testing.
You could even use the interfaces in miro.d.ts to create a set of postMessage commands to send into your plugin to test it’s behaviour in an iframe and use a tool like selenium to verify the DOM changes and trigger the messaging.
Summary
Miro web plugin development is really easy to get started with and hosting your plugin files on Glitch makes development quick and collaborative.
One aspect I have yet to fully understand is the distribution of a web plugin to the Miro marketplace and how a plugin developer would be able to monetise their creations. It looks like you have to offer your Miro integrations for free and charge users outside of the Miro platform.
If you’re on a team that’s using Miro and want to enhance your team’s ability to collaborate by bringing data in from the tools you use then I’d highly recommend spending some time building a Miro web plugin.